
CameraOS, step by step.
Plan the site
What you need before you arrive, and how CameraOS sits on the network.
What you need
| Minimum | Notes | |
|---|---|---|
| Computer | A Mac with Apple silicon (M1 or newer), macOS 13+ | Every Mac mini since 2020 qualifies. It stays on site, next to the recorder. |
| Memory and disk | 16 GB memory recommended, 20 GB free disk | Plus space for recordings: the installer keeps up to 50 GB by default. |
| Cameras | Any camera or NVR that streams RTSP (most IP cameras, ONVIF) | RTMP, HLS and SRT streams work too. You need each camera's IP address, login and channel. |
| Network | The Mac on the same network as the cameras | Wired Ethernet is best. Internet is needed during install and for the optional AI features. |
| License | One license key per computer | You send the computer's ID after installing; the key comes back for that Mac only. |
How it fits together
Each camera is pulled once, by the gateway on the Mac. Recording, the AI and every viewer read from that one connection, so cameras and NVRs never see more than one client. Video, events and settings stay on the Mac.
| Port | Who uses it | Open to |
|---|---|---|
4400 TCP | The web app: every browser and phone | The local network |
8189 UDP | Live video (WebRTC media) to browsers and phones | The local network |
8554, 8000, 8889, 9996, 9997 | Gateway RTSP, AI service, WebRTC, playback, gateway API | This Mac only (127.0.0.1) |
How many cameras per Mac
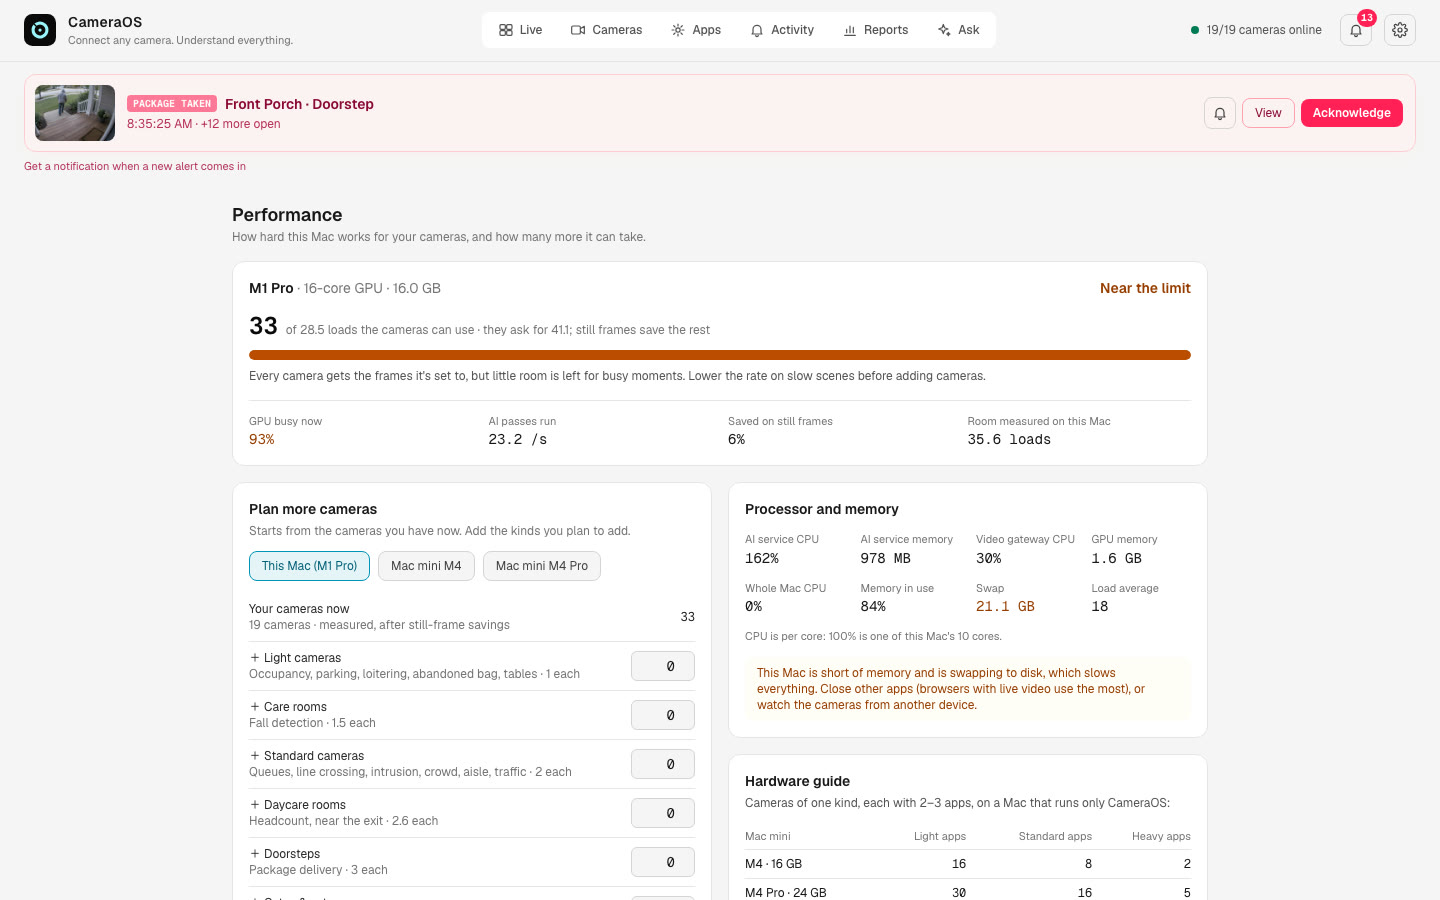
One "load" is one AI pass a second on a light 640×360 sub-stream. Apps are light, standard or heavy:
| Mac | Light apps | Standard apps | Heavy apps |
|---|---|---|---|
| Mac mini M4 · 16 GB | 16 | 8 | 2 |
| Mac mini M4 Pro · 24 GB | 30 | 16 | 5 |
| Mac Studio M4 Max | ~50 | ~25 | ~8 |
Light: occupancy, parking, loitering, line crossing. Standard: waiting line, café, aisle, care, plates. Heavy: factory line. M4 figures are scaled from measurements on an M1 Pro. After setup, gear menu → Performance shows the real load and a "Plan more cameras" calculator.
Install and activate
Install on the Mac, activate the license, create the first admin.
Install
- Unzip the CameraOS download and open the folder.
- Double-click Install CameraOS.command. If macOS says it can't be opened: right-click it, choose Open, then Open again (or System Settings → Privacy & Security → Open Anyway).
- A Terminal window shows the progress. The first install takes 10–20 minutes and needs the internet. No Python, Homebrew or developer tools are needed.
- When it's done, the browser opens CameraOS and the window shows this computer's ID and the setup code. Keep that window open.
Activate the license
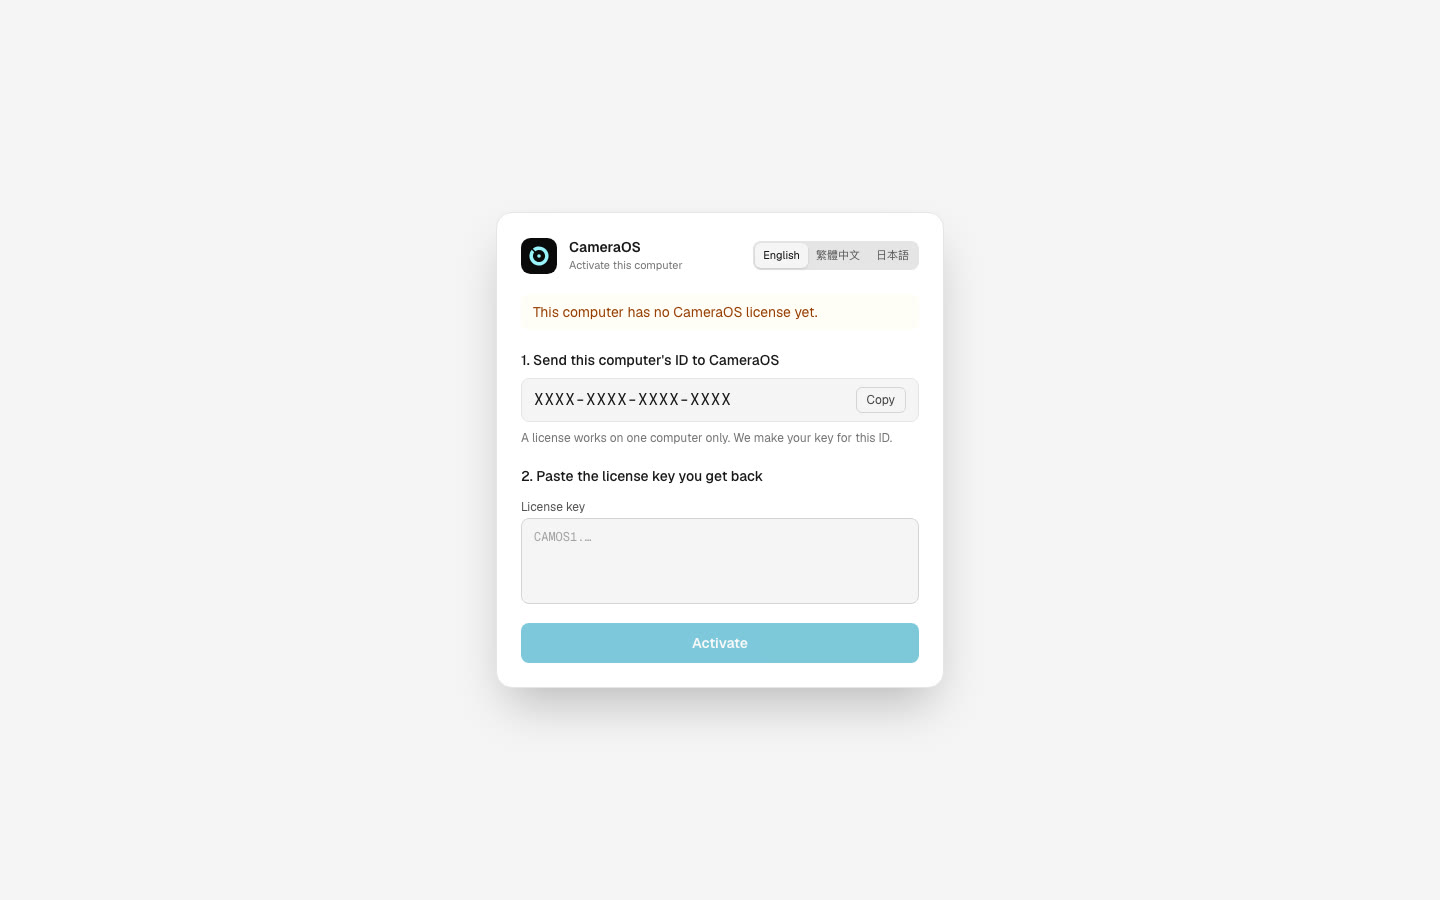
- Every page opens Activate this computer until a license is in.
- Under 1. Send this computer’s ID to CameraOS, press Copy and send us the ID (16 characters, like
XXXX-XXXX-XXXX-XXXX). A license works on one computer only. - Paste the key you get back (it starts with
CAMOS1.) under 2. Paste the license key you get back and press Activate.
Later, gear menu → License shows who it's licensed to, the end date, the apps included and this computer's ID, and takes a new key (for more apps or a later end date).
Create the admin account
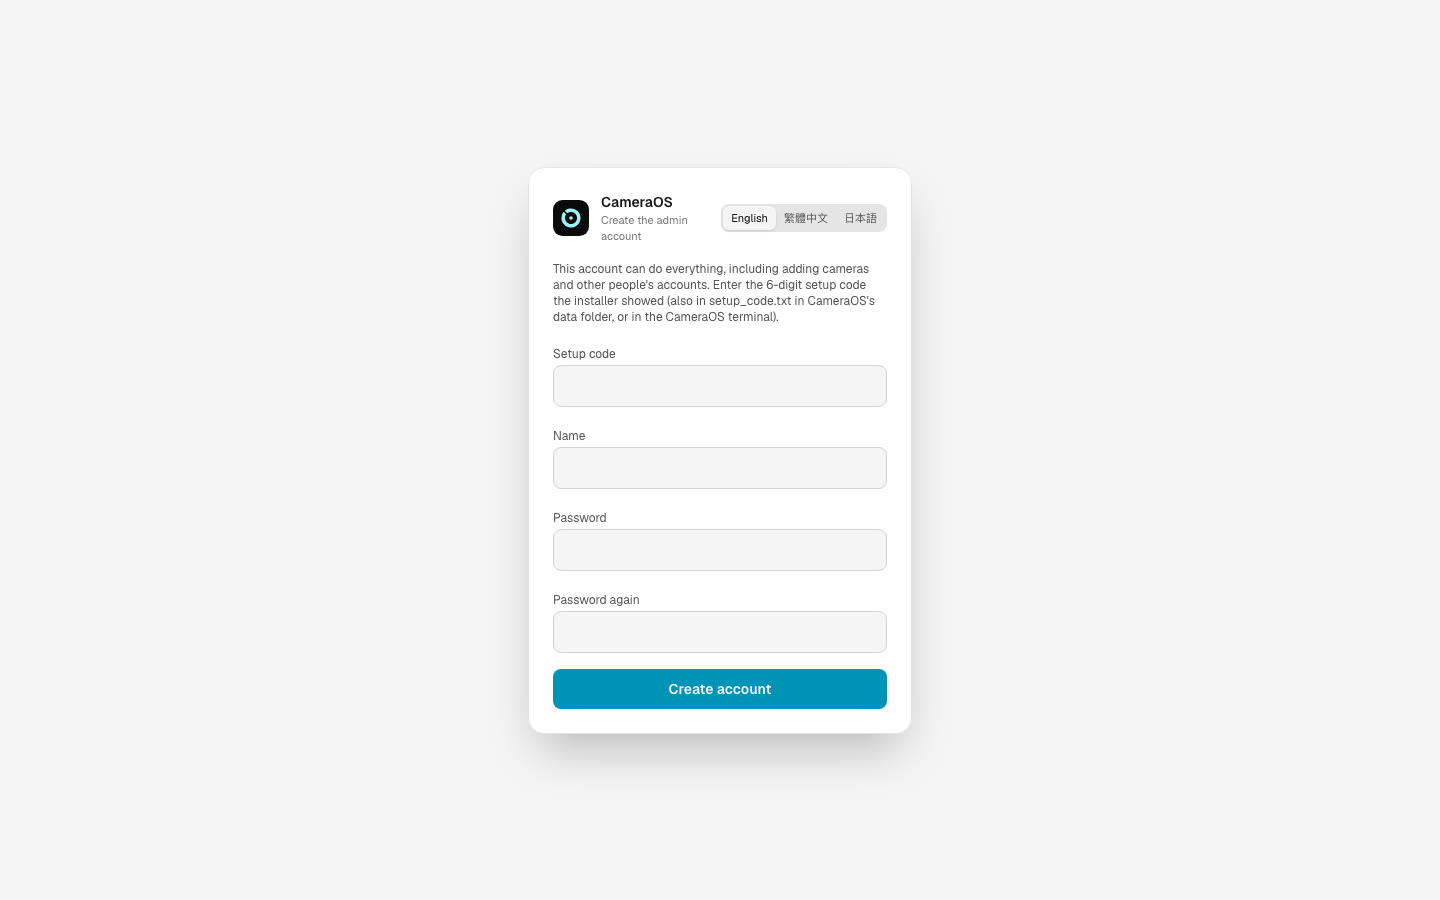
- After activating you land on Create the admin account.
- Enter the 6-digit Setup code from the install window (also in
~/CameraOS/data/setup_code.txt), a Name and a password of at least 8 characters, twice. - Press Create account. You're signed in and land on Live. The setup code stops working once an account exists.
Add people and roles
Give staff their own sign-in, with only what they need.
| Role | What they can do |
|---|---|
| Admin | Everything: cameras, apps, zones, sharing, users, license, AI settings. Sees full stream addresses. |
| Staff | Watches live and playback, handles alerts, searches events, uses Reports and Ask. Changes nothing. Stream passwords are hidden. |
| Viewer | Watches live video and playback only. No alerts, events, reports or Ask. |
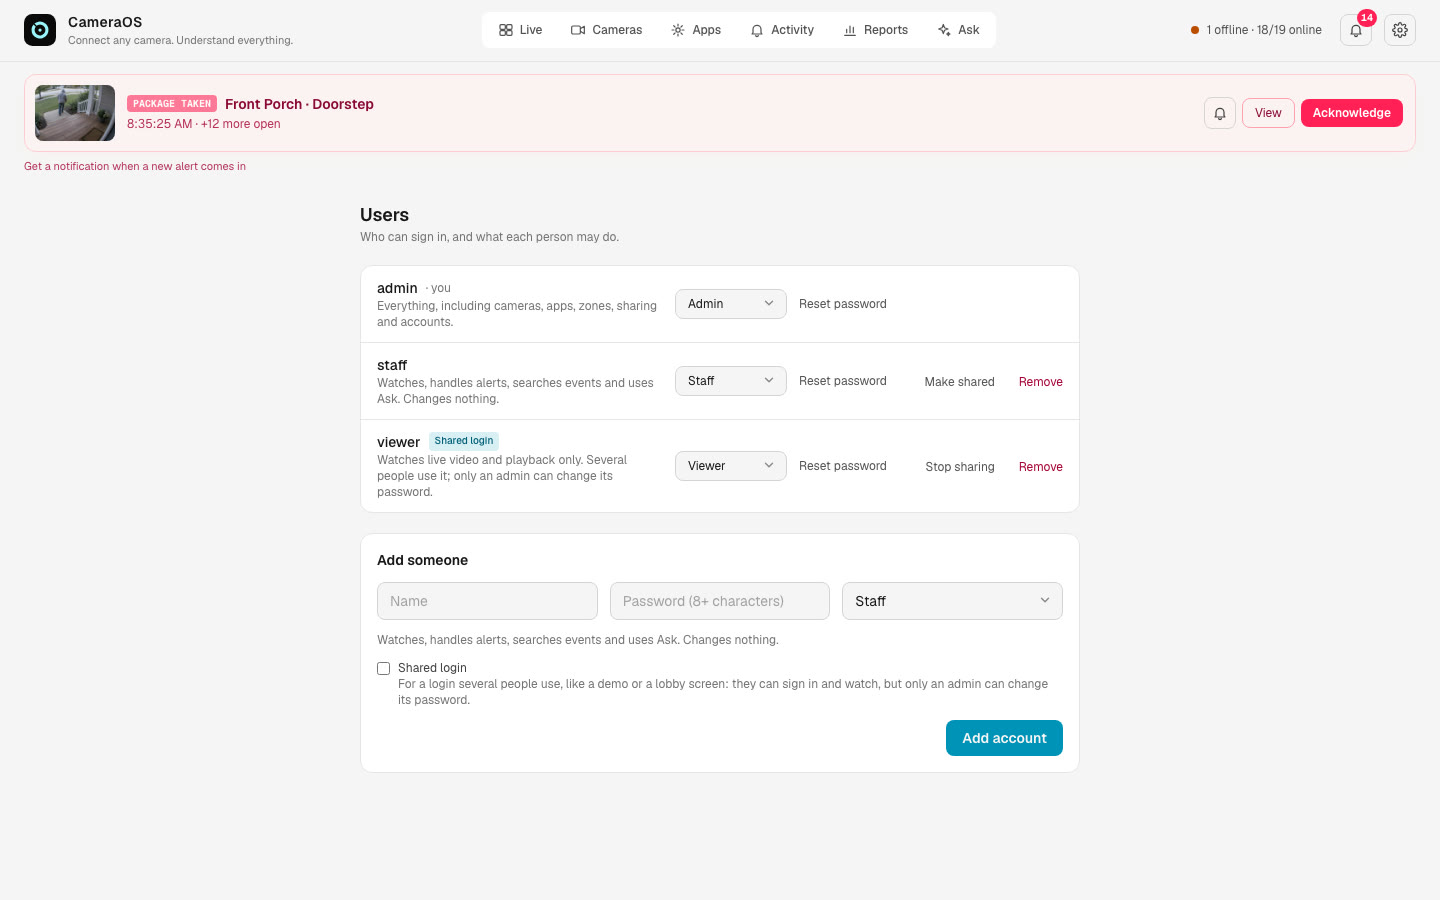
- Gear menu → Users.
- Under Add someone: a name, a password (8+ characters) and a role (Staff by default). Press Add account and give them the name and password; they can change it under Account and password.
- For a screen several people share (a lobby TV, a demo), tick Shared login: they can sign in and watch, but only an admin can change its password. An admin login can't be shared.
Roles change straight away from the dropdown. Reset password signs that person out everywhere. Forgotten password: an admin resets it. CameraOS always keeps at least one admin.
Add a camera
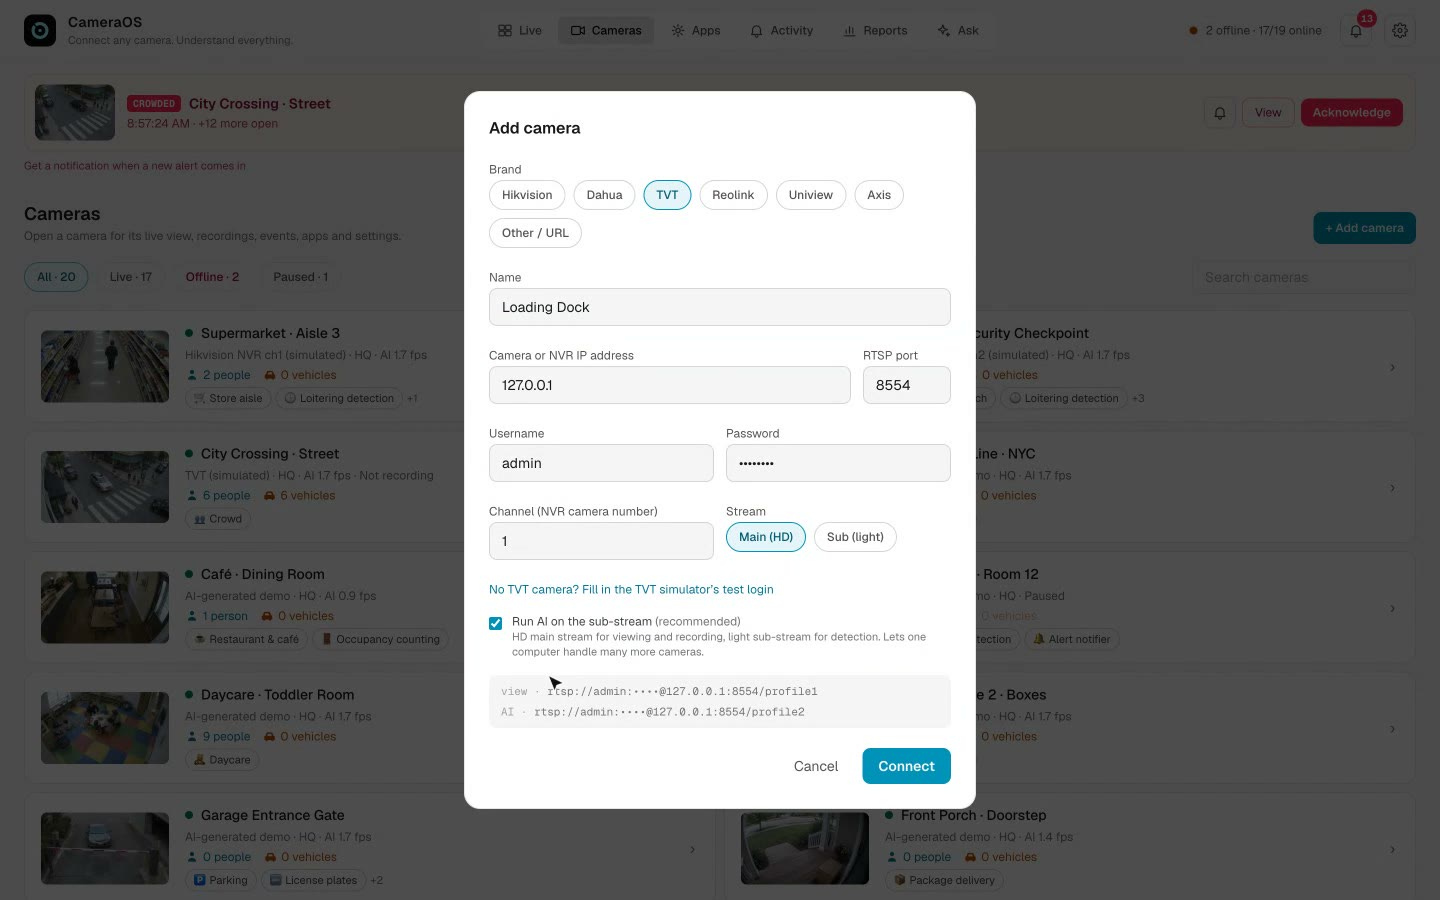
Pick the brand, enter the camera's address and login; CameraOS builds the stream URL.
- Cameras tab → + Add camera (or gear menu → + Add camera).
- Pick the Brand: Hikvision, Dahua, TVT, Reolink, Uniview, Axis, or Other / URL.
- Give it a Name ("Loading Dock"), then the Camera or NVR IP address, RTSP port (554), Username, Password and Channel (NVR camera number).
- Leave Stream on Main (HD) with Run AI on the sub-stream (recommended) ticked. Check the two URLs in the grey box.
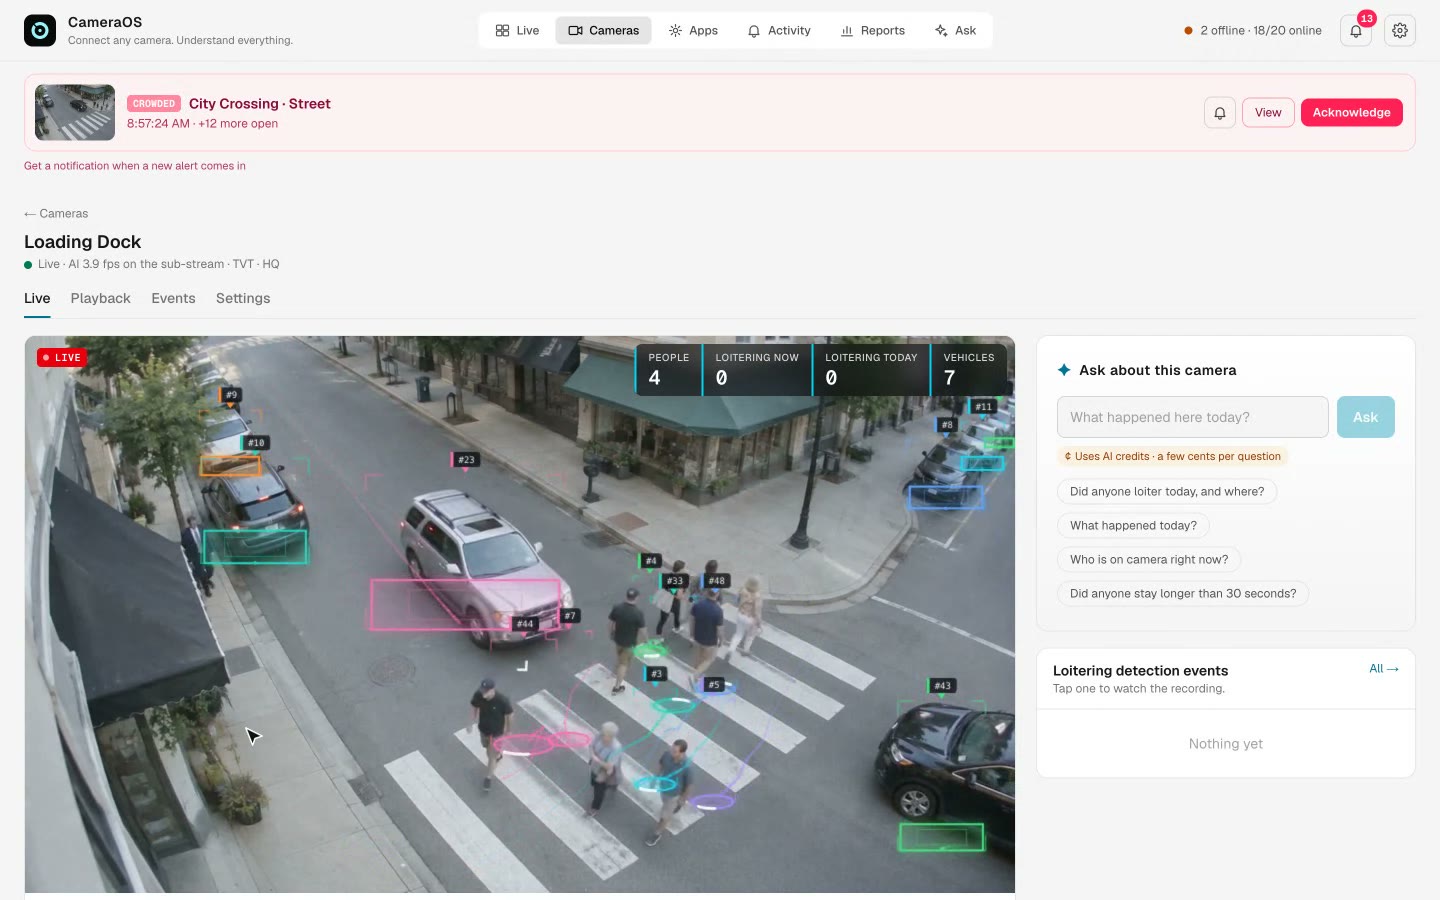
- Press Connect. The camera appears in the list and opens with live video.
The URLs each preset builds
| Brand | Main stream (view and record) | Sub-stream (AI) |
|---|---|---|
| Hikvision | /Streaming/Channels/N01 | /Streaming/Channels/N02 |
| Dahua | /cam/realmonitor?channel=N&subtype=0 | …&subtype=1 |
| TVT | /profile1 (no channel) | /profile2 |
| Reolink | /h264Preview_0N_main | /h264Preview_0N_sub |
| Uniview | /unicast/cN/s0/live | /unicast/cN/s1/live |
| Axis | /axis-media/media.amp (no channel) | none: the AI uses the main stream |
Each URL is rtsp://user:password@ip:port<path>, with N the channel. Any other camera: Other / URL takes a Stream URL (RTSP, RTMP, HLS, SRT) and an optional AI stream URL.
A new camera starts with one app, Loitering detection, and starts recording straight away.
Configure the camera
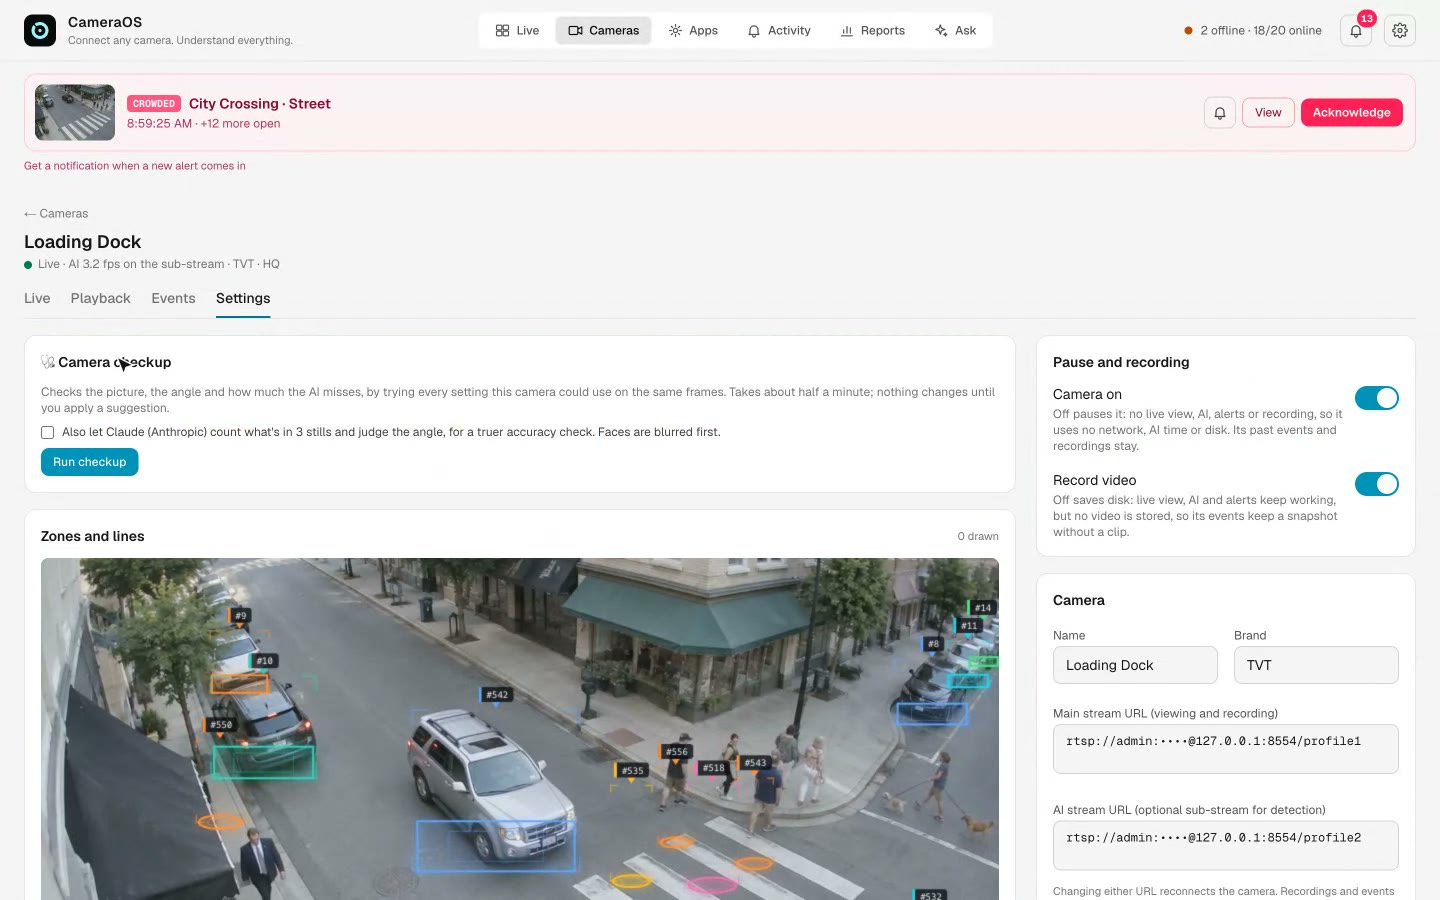
Recording, stream addresses, privacy and what AI assistants may see: the camera's Settings tab.
Open the camera → Settings (admins only). Left column: Camera checkup, Zones and lines, Floor map, one panel per installed app. Right column:
| Panel | What it does |
|---|---|
| Pause and recording | Camera on off pauses everything (no live view, AI, alerts or recording). Record video off keeps live view, AI and alerts but stores no video. |
| Camera | Name, brand, main stream URL and AI stream URL. Changing a URL reconnects the camera; recordings and events are kept. |
| Privacy and sharing | Blur faces publishes a face-blurred stream; then Create public link gives a no-login page. AI assistants sets what connected AI assistants may see (chapter 14). |
| Remove camera | Stops live view, recording and its apps. Past events stay searchable. |
Floor map (optional)
Floor map → Mark the floor: drag four corners onto a rectangle on the ground (tiles, parking bays, a room's corners), optionally with its size in metres. The Live tab then shows everyone as dots on a top-down plan.
Storage and history
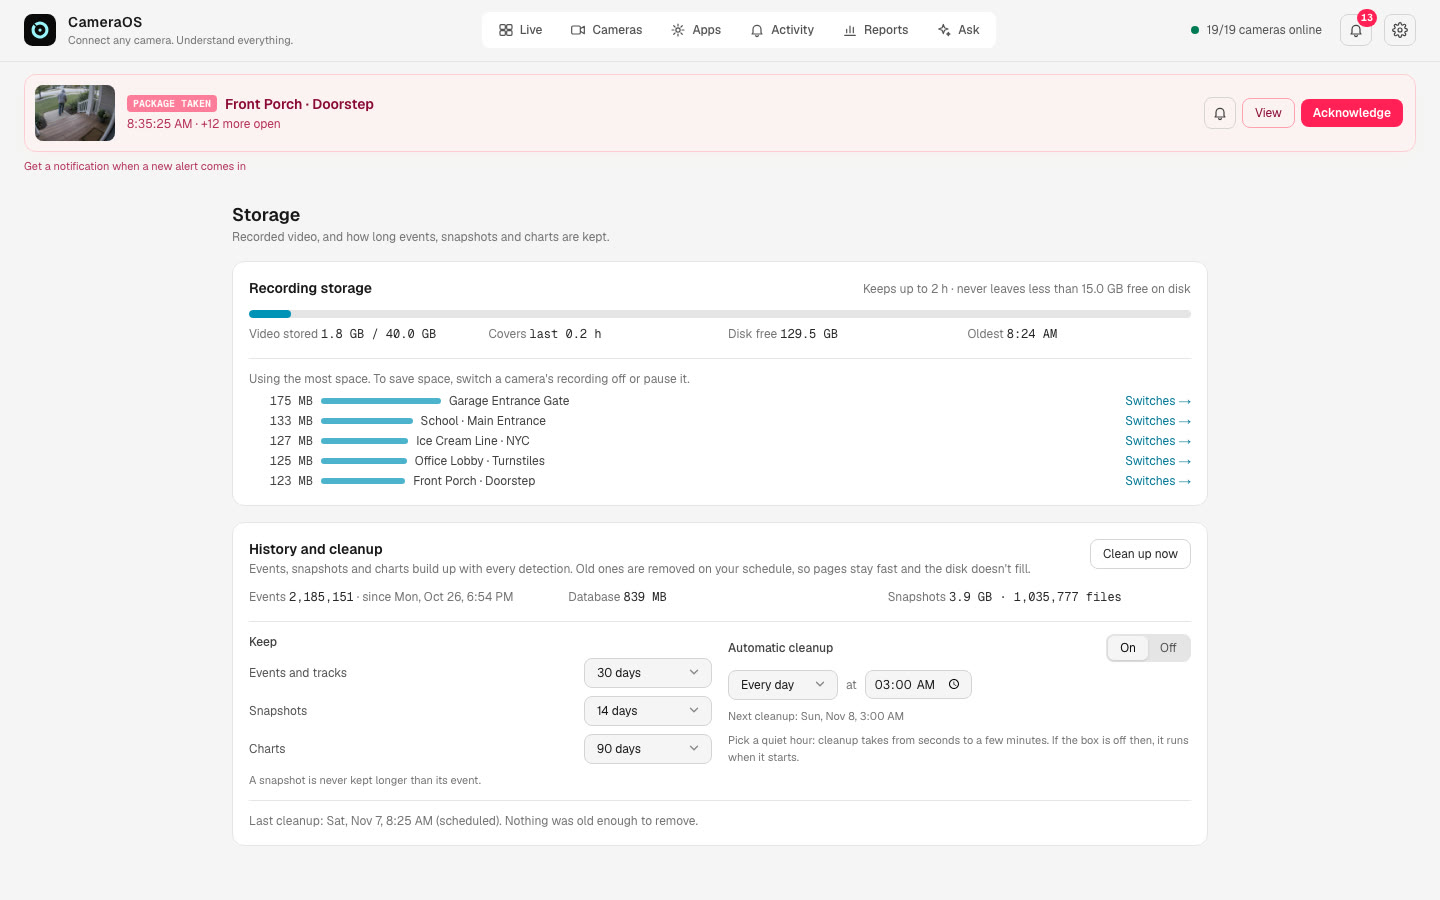
Gear menu → Storage and cleanup: how much video is stored and how far back it goes, the cameras using the most space, and how long to keep history:
| Keep | Default | Choices |
|---|---|---|
| Events and tracks | 30 days | 7 days to forever |
| Snapshots | 14 days | 3 days to forever |
| Charts | 90 days | 30 days to forever |
Recordings are kept up to 24 hours within a 50 GB budget (installer default), and CameraOS never leaves less than 15 GB free: it trims the camera using the most space first, and pauses recording if the disk is critically full. A larger budget: run the installer from Terminal with CAMERAOS_MAX_RECORDINGS_GB=200 set.
Add an app
Apps turn the camera's detections into the numbers a business asks about. Four steps.
- On the camera's Live tab press + Add app (or Apps → App Store). Search, or filter by group; hover a card to see its live demo.
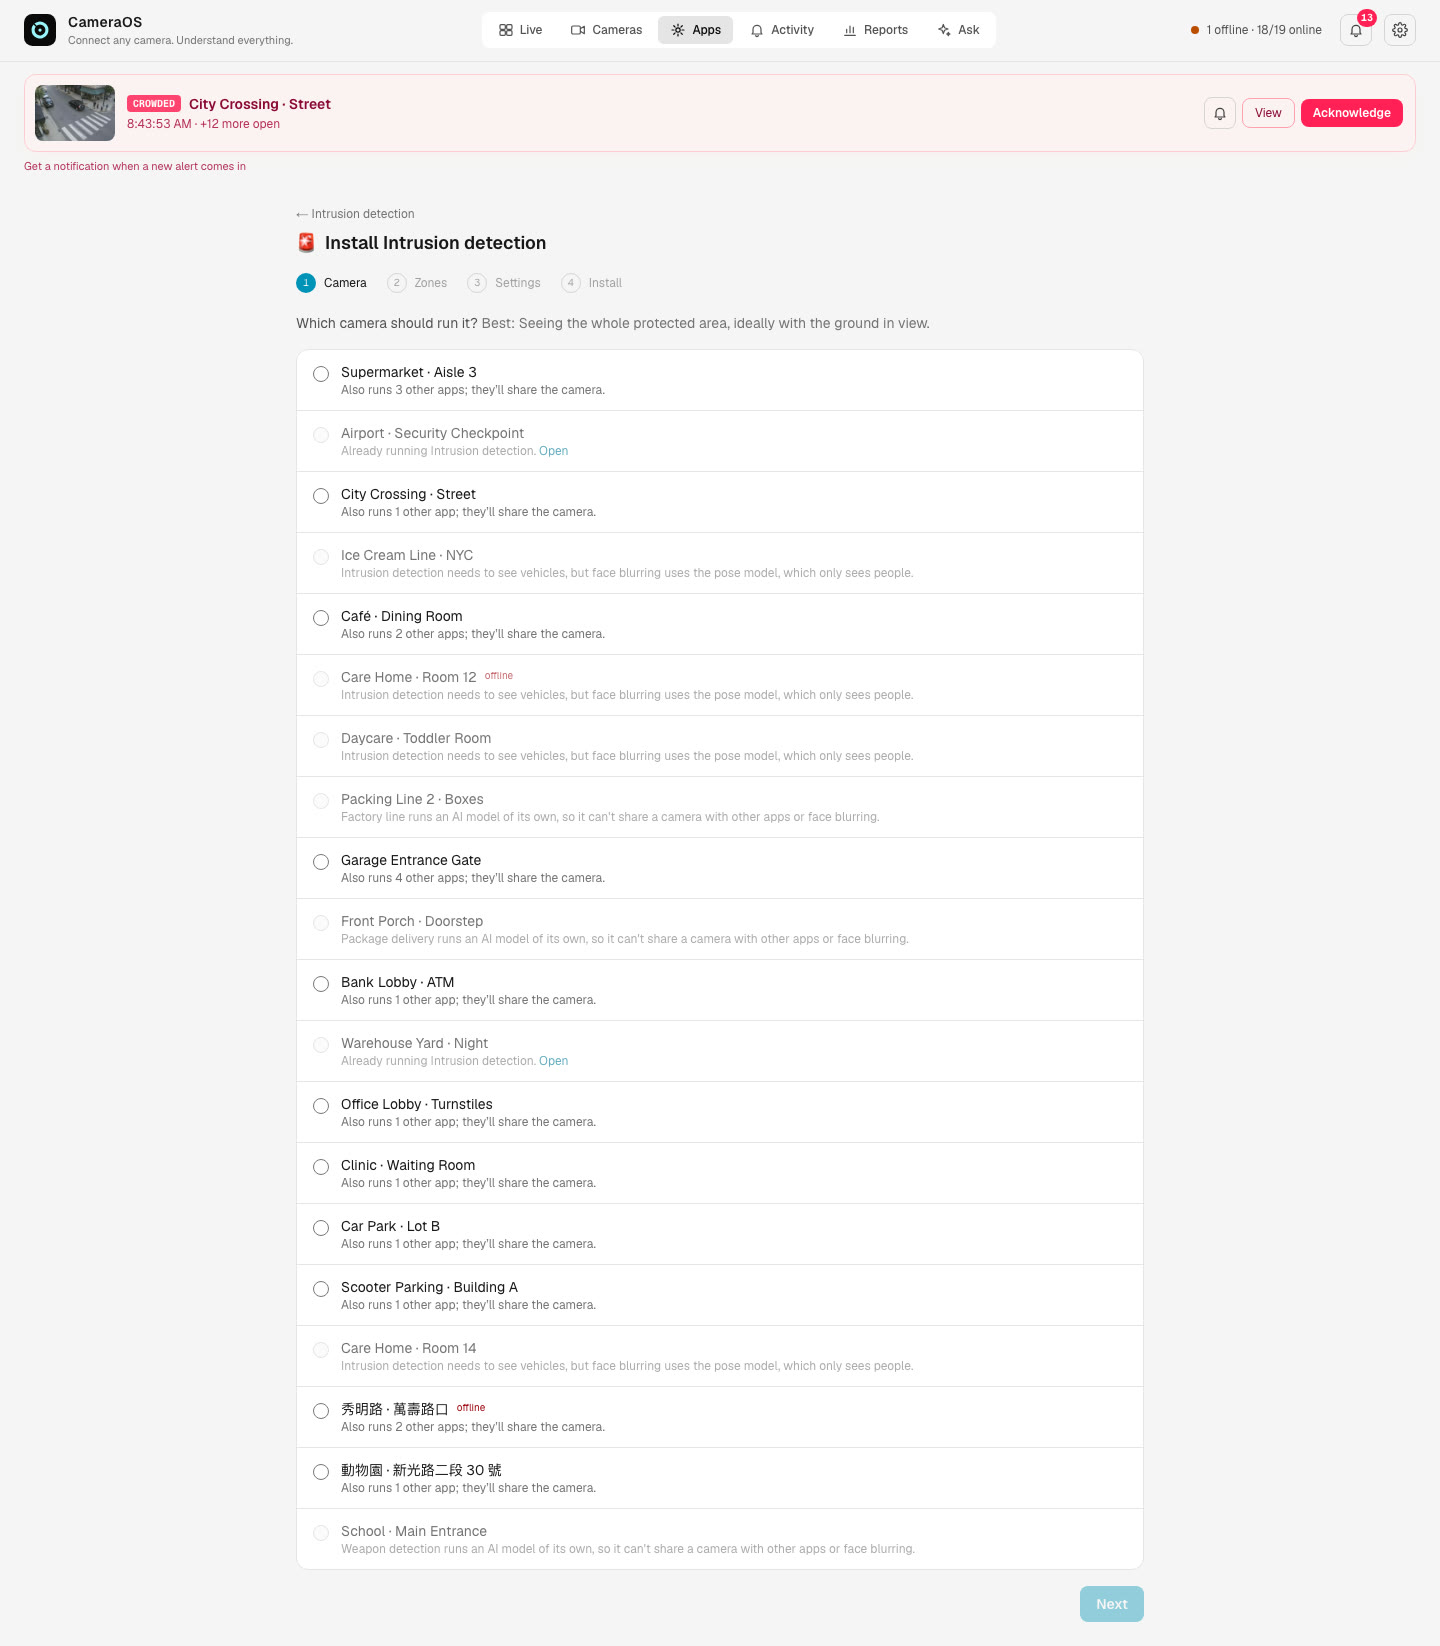
- Press Install. Step Camera: pick the camera. Cameras that can't run it are greyed out, with the reason.
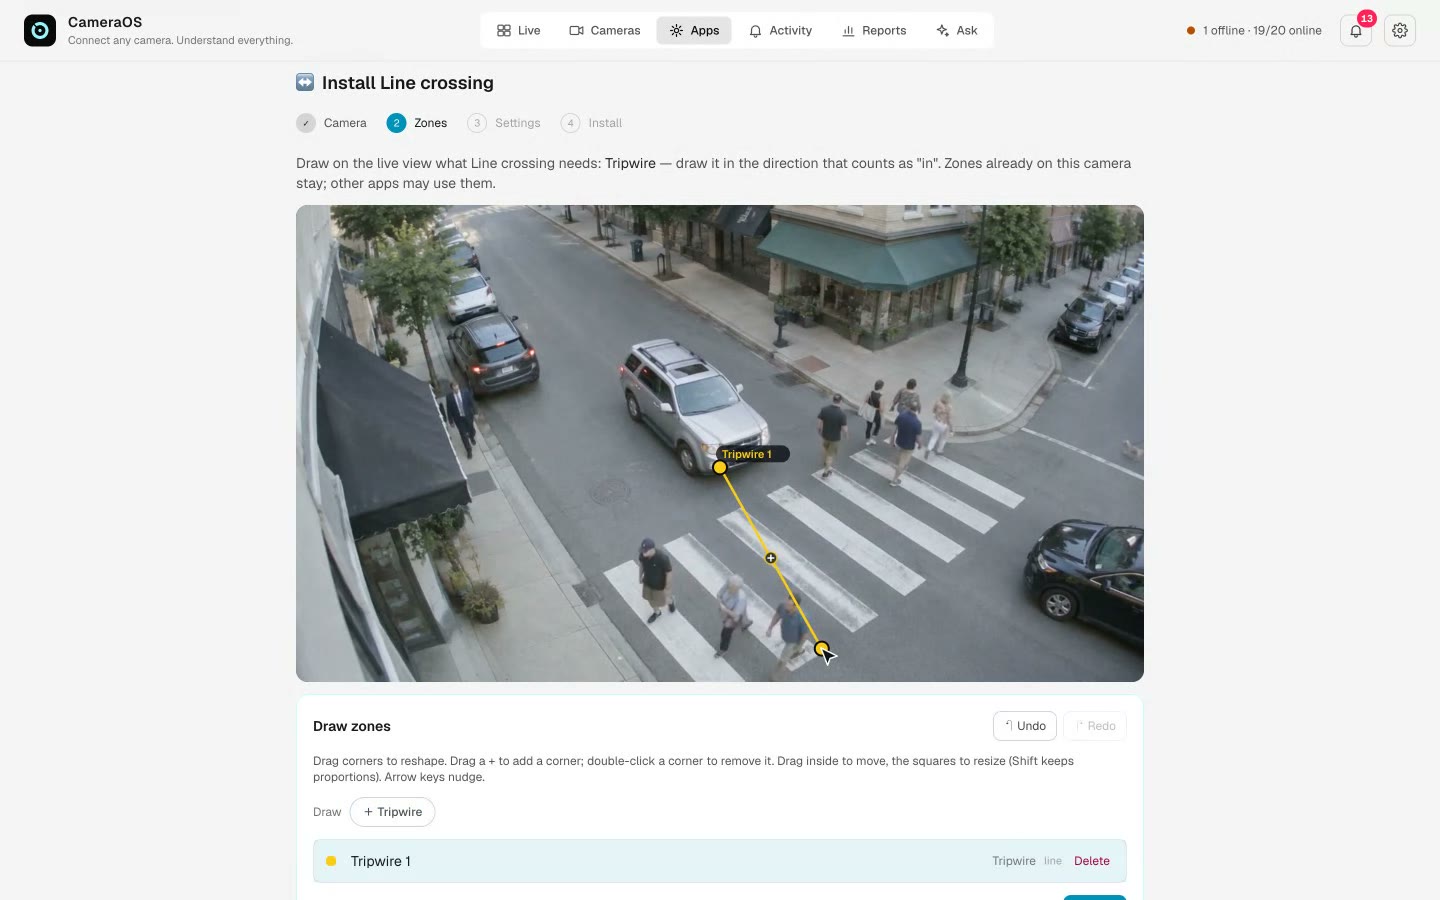
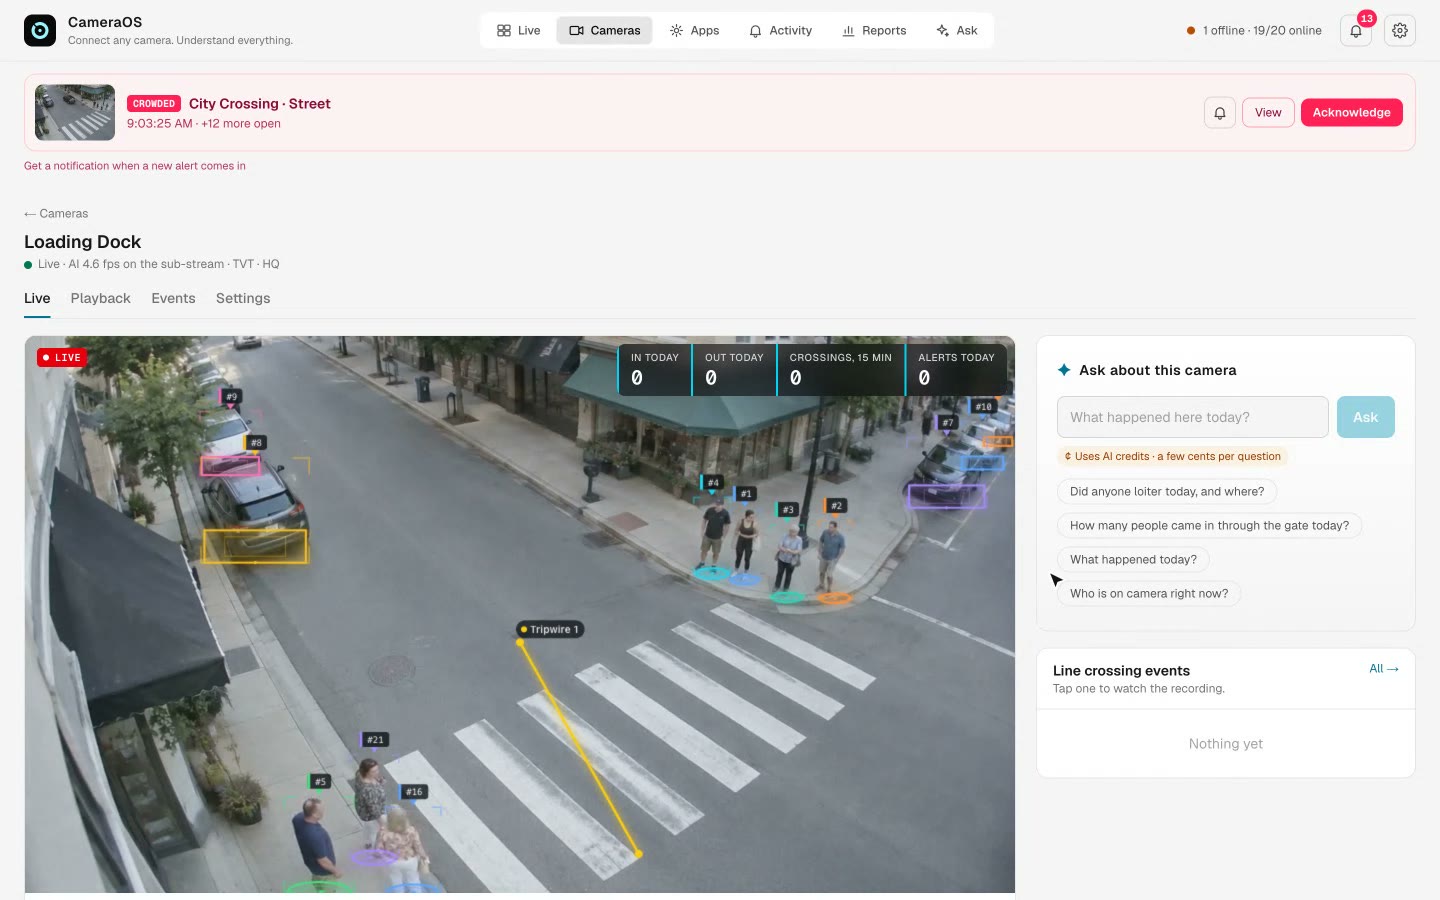
- Step Zones: draw what the app needs on the live view (chapter 7). Line crossing needs a Tripwire, drawn in the direction that counts as "in".
- Step Settings: the defaults suit most cameras. Blur faces on this camera is on for apps where people expect privacy.
- Step Install: check the summary and press Install on <camera>. The camera's AI restarts with the app in a few seconds.
Which apps can share a camera
Apps on one camera share one AI pass. The wizard refuses combinations that can't, and says why:
| Rule | Example |
|---|---|
| Factory line, Package delivery and Weapon detection run an AI model of their own | They need a camera to themselves, with no other apps and no face blurring. |
| Face blurring uses the pose model, which only sees people | Parking, License plates, Traffic flow and Abandoned object can't join a camera that blurs faces. |
| Care, Daycare and Waiting line use the pose model too | An app that needs vehicles can't join a camera running them. |
| Gate controller works with License plates | Install License plates on the camera first. |
| Apps outside your license | Shown greyed out: “Not in your license”. |
Draw zones and lines
Zones tell an app where to look: a queue, a table, a no-go area, a line to count.
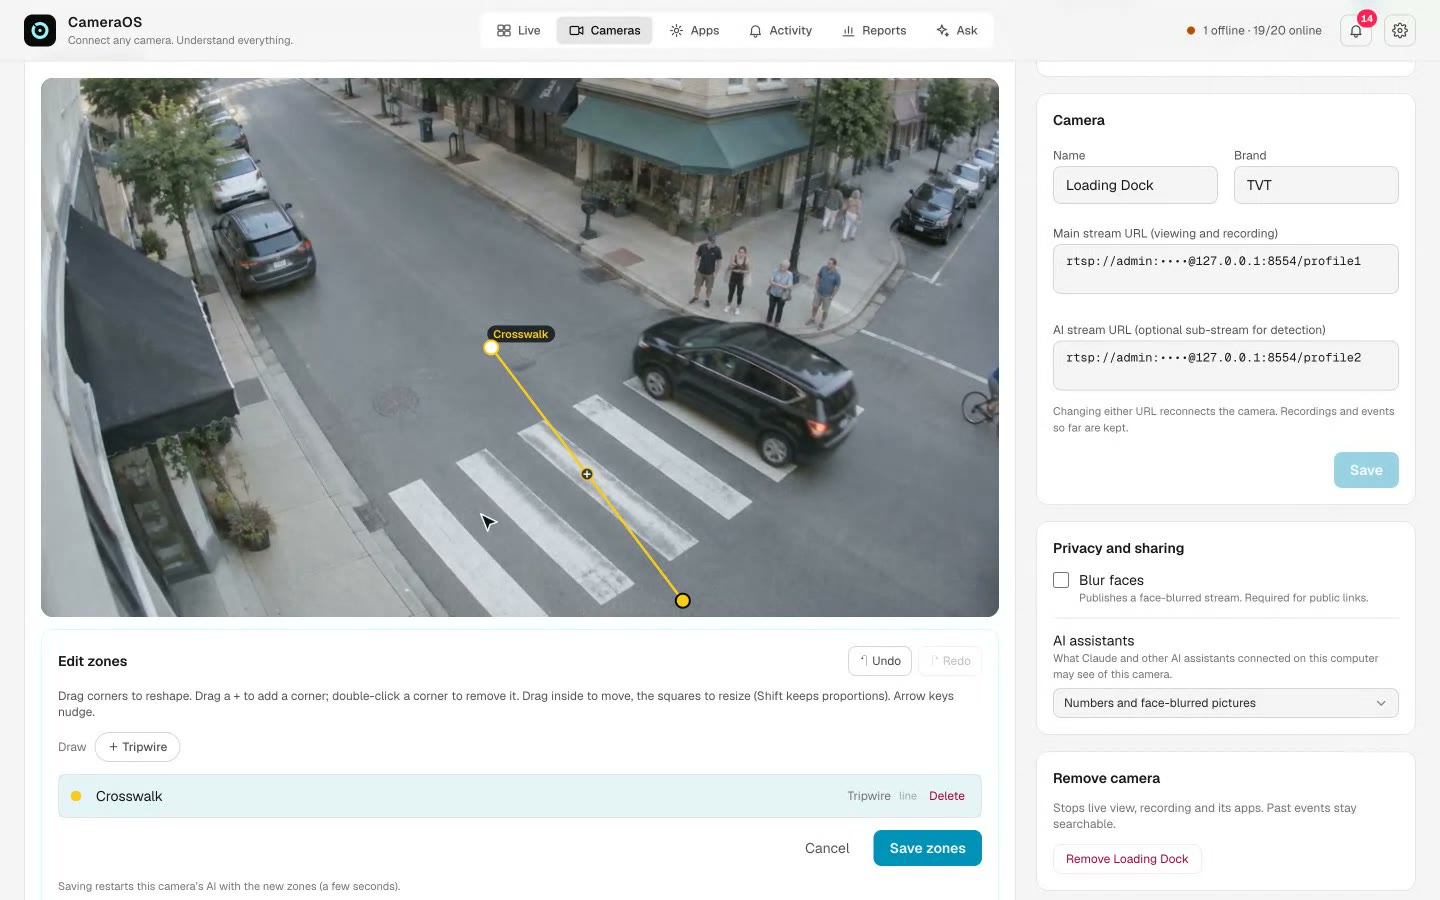
- Camera → Settings → Zones and lines → Edit zones (or step 2 of the install wizard).
- Pick what to draw under Draw, for example + Zone.
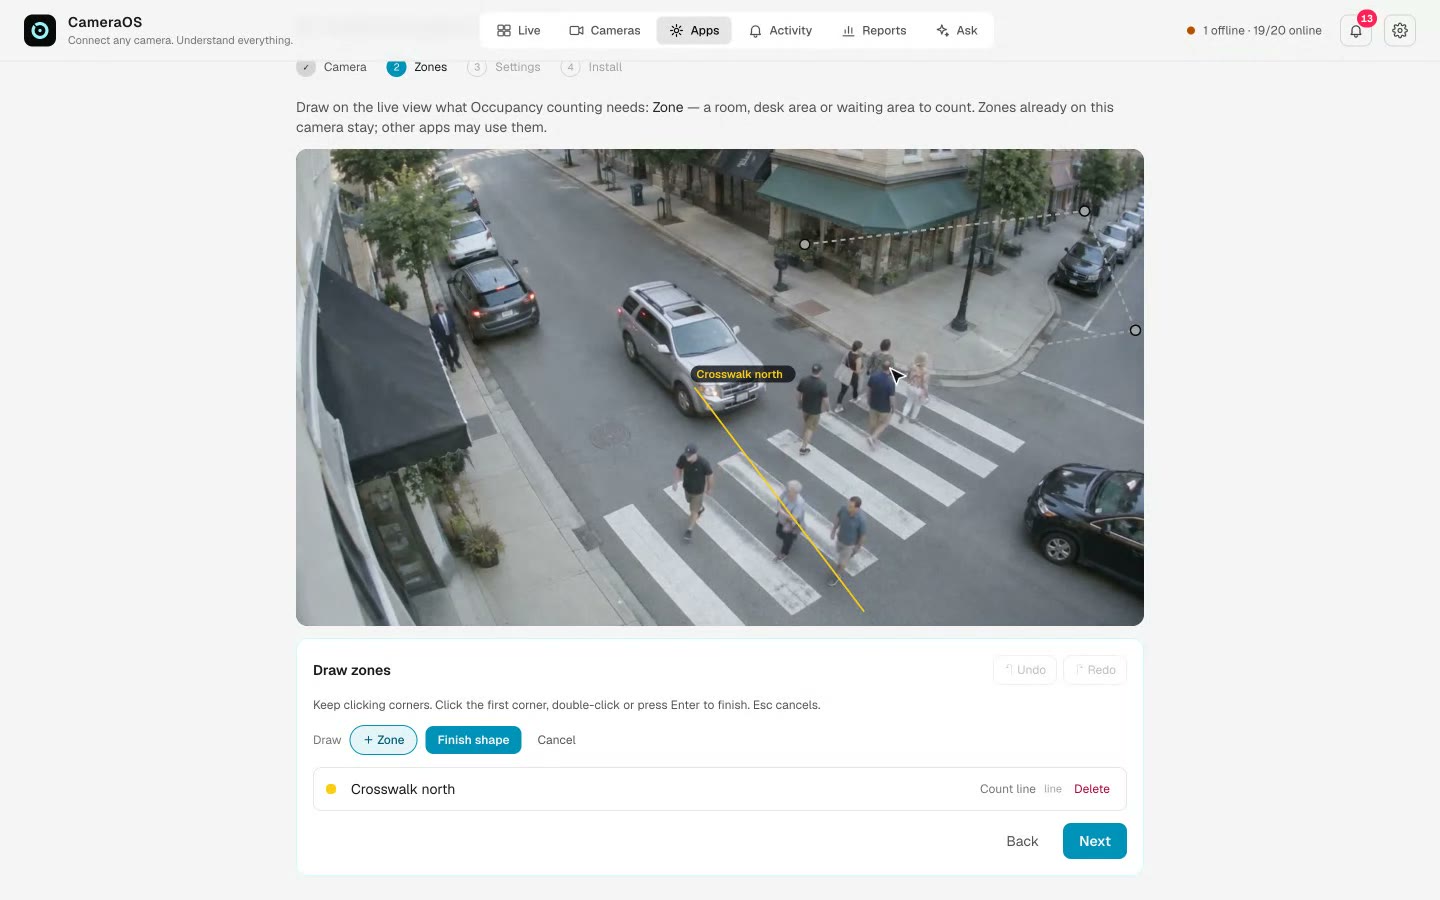
- Click the corners one by one. Click the first corner, double-click or press Enter to finish (Finish shape appears after three corners). Or press and drag for a rectangle. A line: click its two ends.
- Rename it in the list: type and press Enter.
- Press Save zones. The camera's AI restarts with them in a few seconds.
| To | Do this |
|---|---|
| Select a zone | Click it on the video, or its row in the list |
| Reshape | Drag a corner. Drag a + on an edge to add a corner; double-click a corner to remove it |
| Move / resize | Drag inside the zone / drag the square handles (Shift keeps proportions) |
| Nudge | Arrow keys (Shift for bigger steps) |
| Delete | Delete or Backspace removes the selected corner or zone |
| Undo / redo | ⌘Z / ⇧⌘Z (or ⌘Y) |
| Cancel drawing | Esc |
Kinds of zone
| Kind | Used for |
|---|---|
| Queue area | Where people stand in line (Waiting line) |
| Table | Each table (Restaurant & café) |
| Shelf | The floor in front of a shelf section (Store aisle) |
| Parking spot | Each bay: draw it on the painted bay |
| No-go zone | Alert when someone enters |
| Count line | Counts crossings each way (two points) |
| Area | Any region to count people in (Occupancy, Crowd) |
| Protected zone | Alert when someone enters in armed hours (Intrusion) |
| Porch | Where parcels are left (Package delivery) |
The editor offers the kinds the camera's apps use, with the apps' own names (Line crossing calls its line a Tripwire). Zones belong to the camera and are shared by its apps; uninstalling an app keeps them.
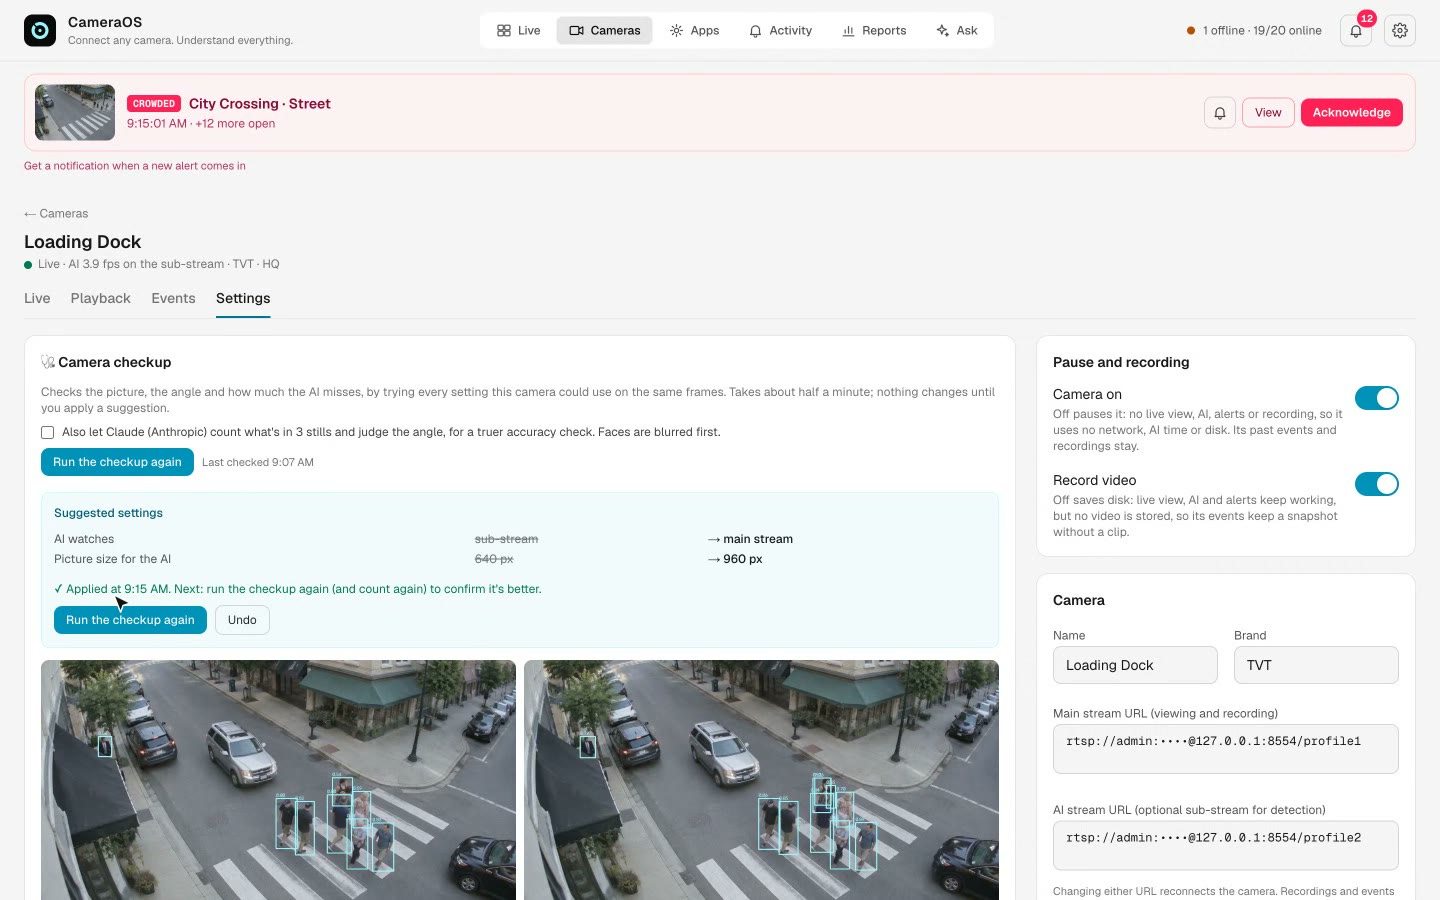
Run the camera checkup
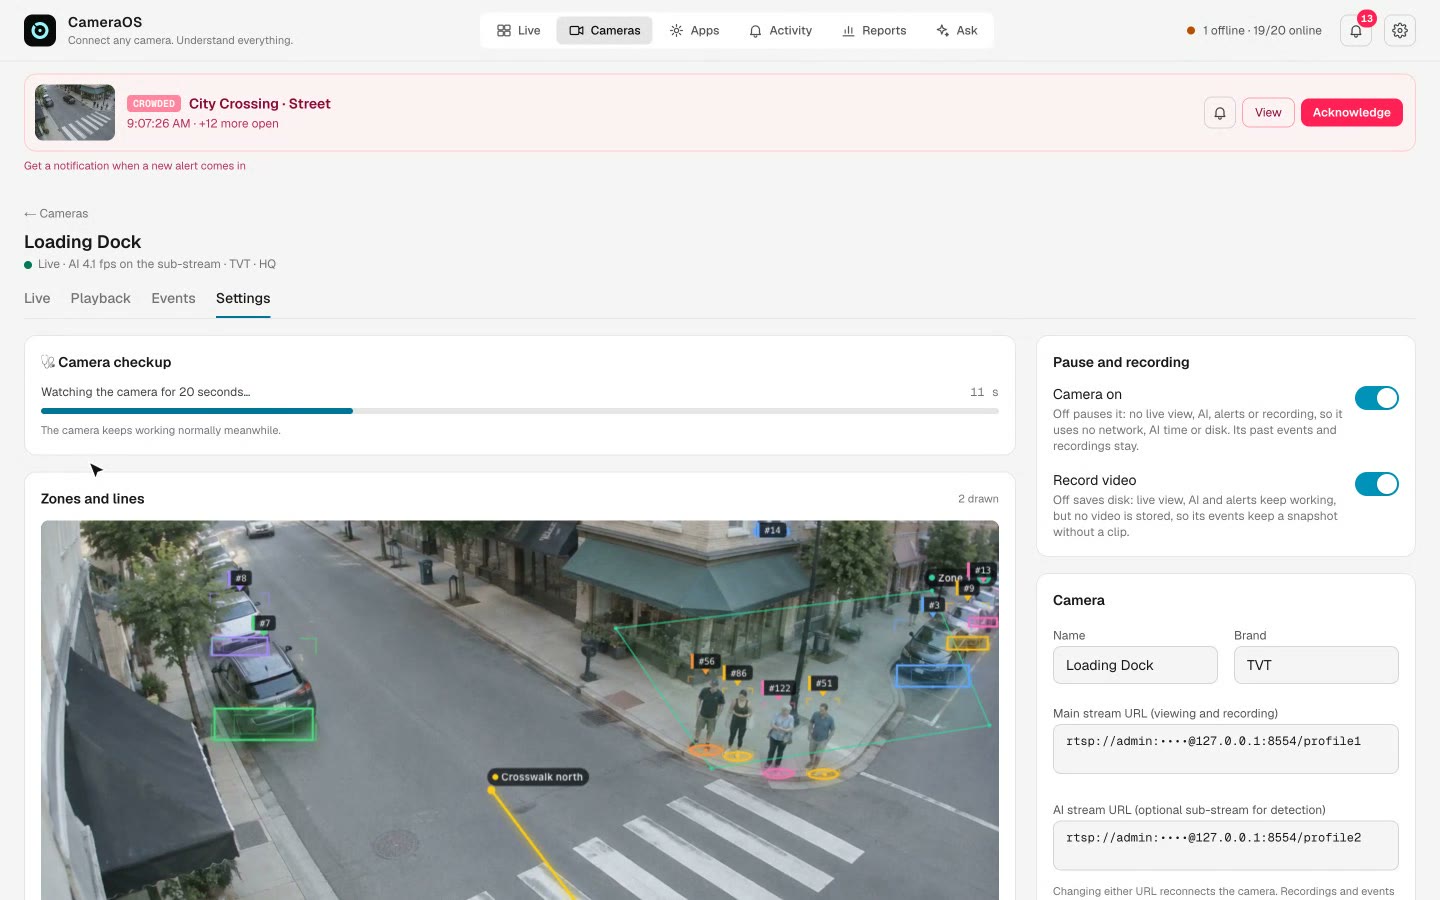
Is this camera set up right? In about 30 seconds the checkup troubleshoots it and suggests what to change.
- Camera → Settings → Camera checkup → Run checkup.
- It watches the camera for 20 seconds, measures the main and sub-streams, then runs this camera's AI on the same frames at every setting it could use (sub-stream or main stream, picture sizes 640/960/1280, how sure the AI must be). The camera keeps working meanwhile.
- Read the four rows: each is Good, Could be better or Needs fixing.
- If it suggests settings, press Apply suggestion. Undo puts the old settings back, even after another checkup.
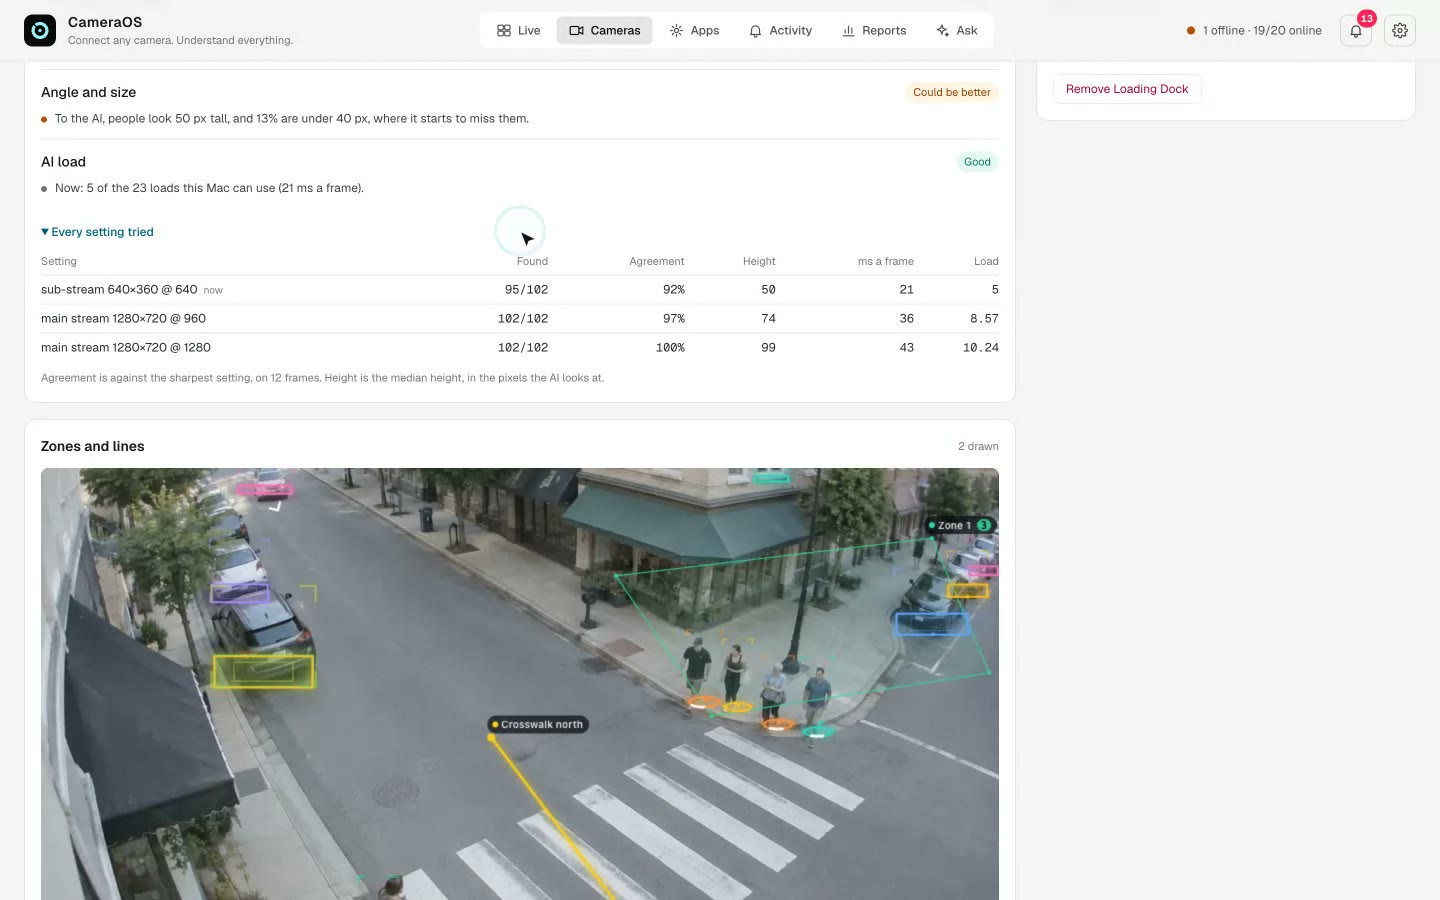
| Row | What it checks | Example (Loading Dock) |
|---|---|---|
| AI accuracy | How much the AI finds at the current setting, against the sharpest one, or against your own count (chapter 9) | 92% of what the sharpest setting finds |
| Picture and streams | Resolution, frame rate, bitrate and codec of each stream; damaged frames, dark, backlit, blurry, infrared | Main 1280×720 · 24 fps · 1,448 kbit/s H.264; sub 640×360 |
| Angle and size | How tall the people (or vehicles, items) look to the AI: under 40 px it starts to miss them | People look 50 px tall; 13% are under 40 px |
| AI load | This camera's share of what the Mac can run, and whether the AI keeps up | 5 of the 23 loads this Mac can use (21 ms a frame) |
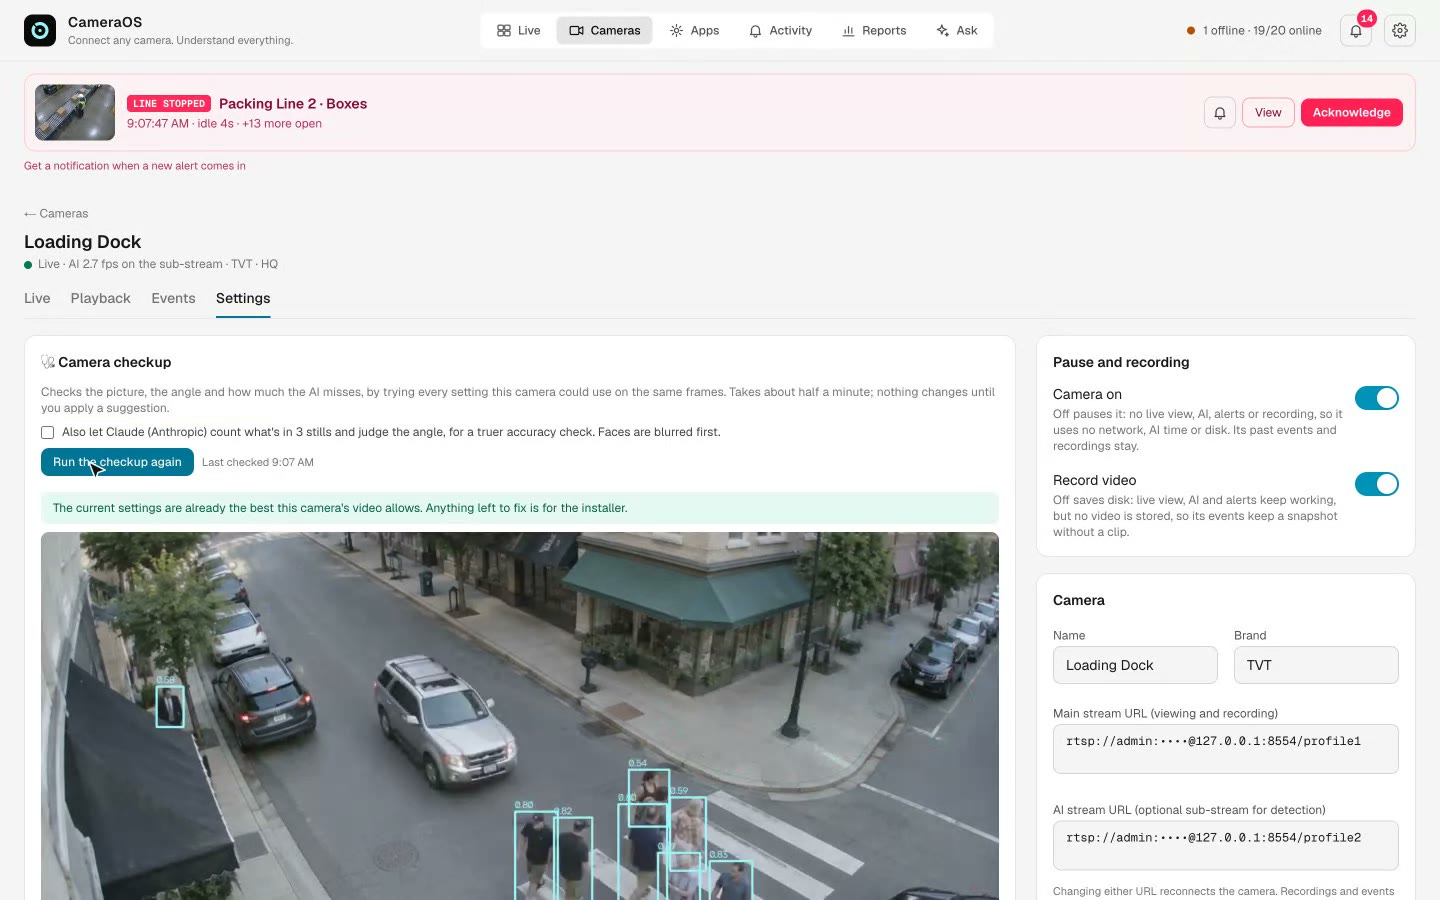
Problems only the camera or a ladder can fix appear in a grey 🔧 For the installer box: raise the sub-stream to 640×480 or 720p, raise the bitrate or use H.265, check the cable or move off Wi-Fi, add light or IR, turn on WDR/BLC, clean and refocus, mount higher or closer.
Test the AI's accuracy
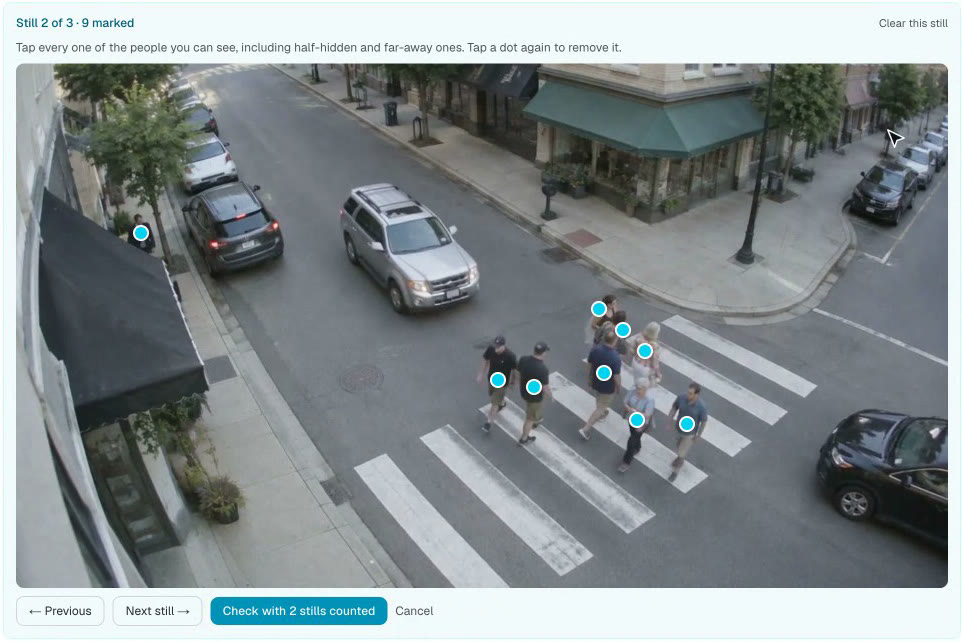
Count the people yourself on three stills, and the checkup scores the AI against you. Free, and nothing leaves the Mac.
- After a checkup, press 👆 Count it yourself.
- Tap every person you can see on the still, including half-hidden and far-away ones. Tap a dot again to remove it. About 20 seconds a still.
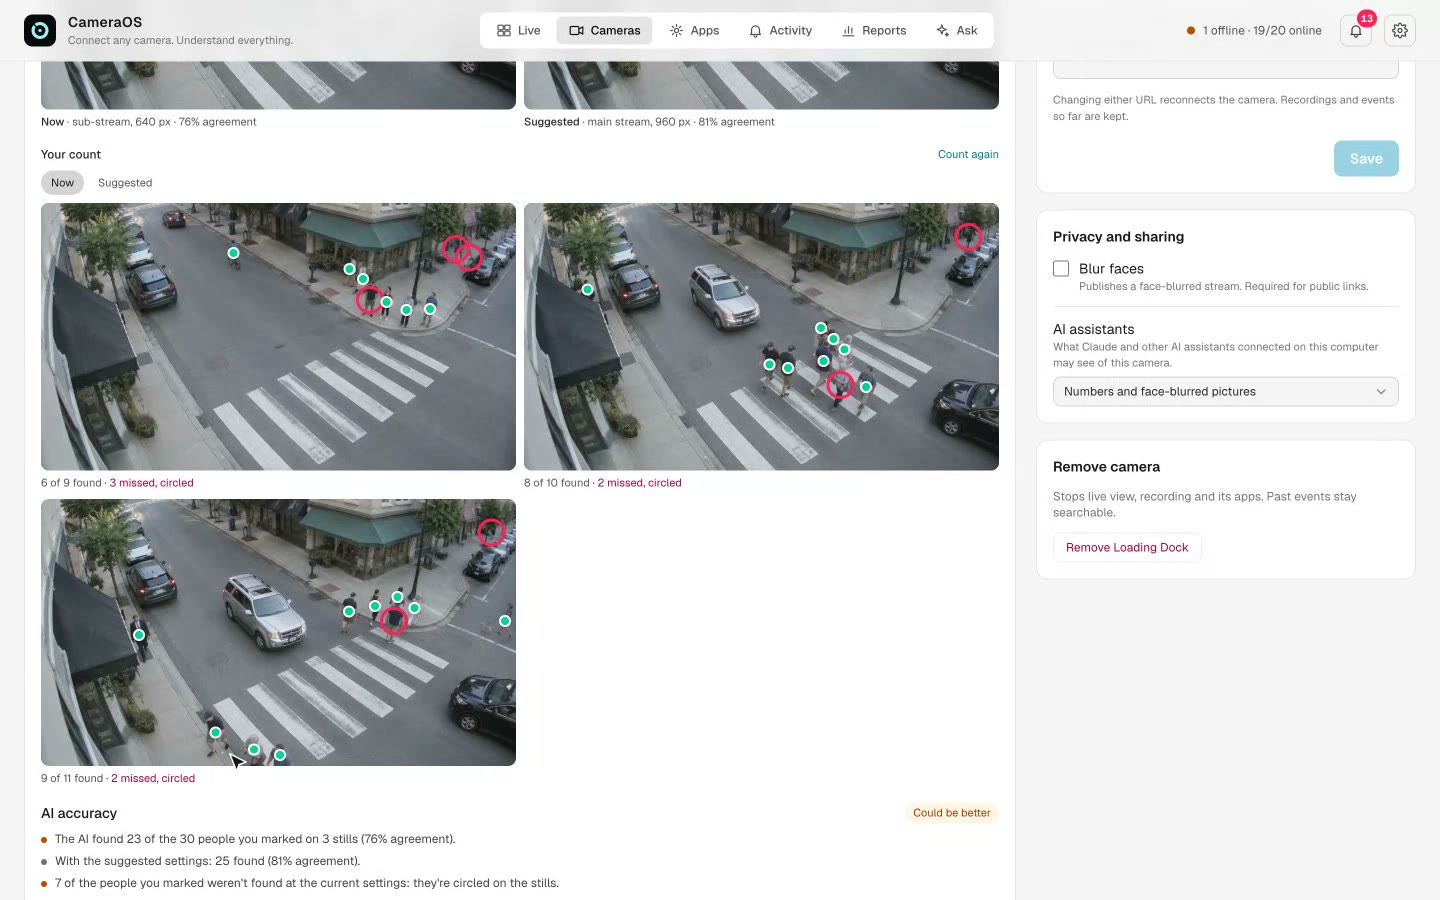
- Next still → for the second and third still, then Check against my count.
- The report is scored again against your count. Your count shows each still: found people in green, missed ones circled in red. Count again starts over.
Other ways to check the AI
| Tool | Where | Cost |
|---|---|---|
| Let the AI count | Checkup → tick Also let … count what’s in 3 stills and judge the angle before running: faces are blurred first | AI credits |
| See what the AI sees | Gear menu → AI on video: Tracker (rings, tags, trails) or Boxes | Free |
| Is the AI keeping up? | Gear menu → Performance: frames a second looked at vs asked for, ms per pass | Free |
| Quality check / Room summary | Factory line and Daycare cameras: ✦ Inspect now / ✦ Summarize the room | A few cents each |
Find your way around
Six tabs, a header that tells you what needs attention, and a video wall.
| Tab | What's there |
|---|---|
| Live | Every camera with its AI overlay and key numbers, filtered by group; Grid or ⛶ Wall. Wide screens add Ask, Needs attention and the latest events. |
| Cameras | All, Live, Offline, Paused. A row opens the camera: Live · Playback · Events · Settings. |
| Apps | Installed apps, the ones that need someone first, with totals across cameras; the App Store. |
| Activity | Needs attention (open alerts by time or by camera) and All events (search by time, type, camera). |
| Reports | Today, last 7 or 30 days against the period before (chapter 12). |
| Ask | Questions in plain English about the chosen cameras (chapter 13). Hidden when AI is off. |
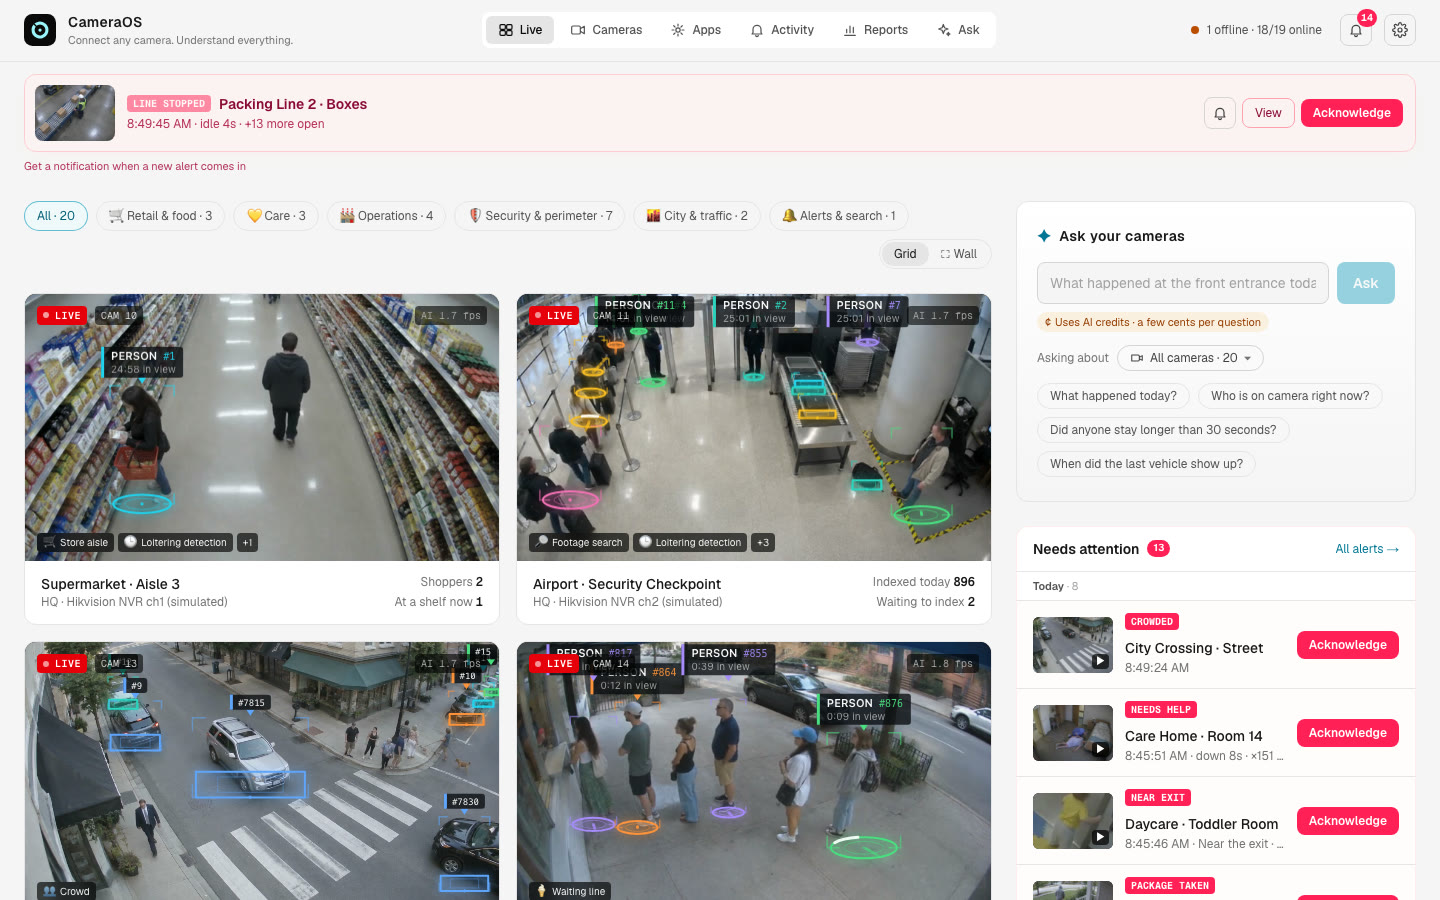
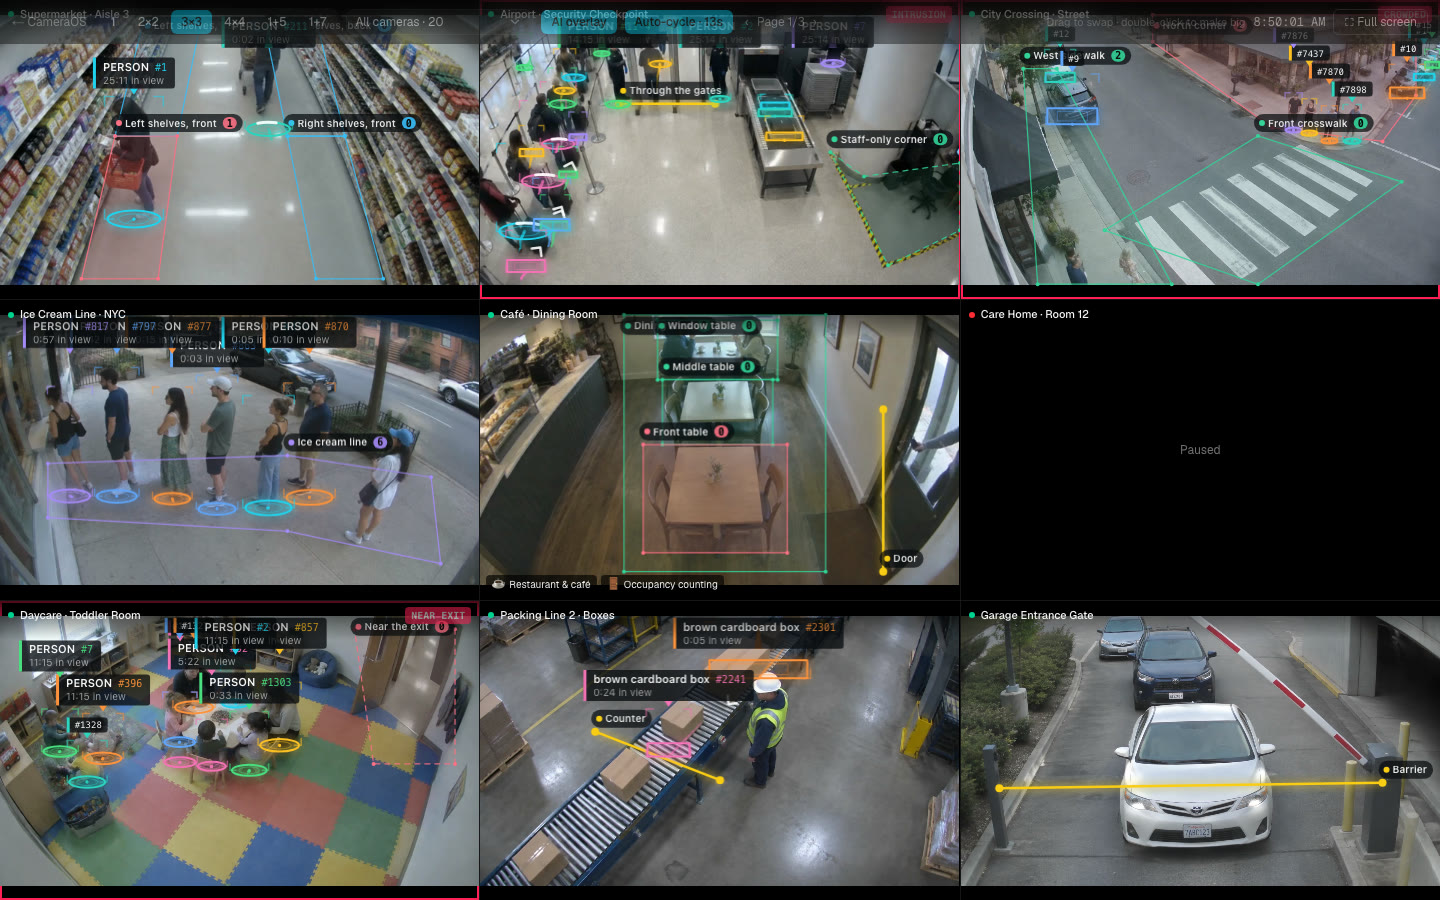
The header: the camera count turns amber when one is offline and links to it; the bell shows open alerts; the gear holds Add camera, Users, Storage, Performance, License, Video wall, language (English, 繁體中文, 日本語), theme, AI on video, alert sound and AI assistant. On a phone, tabs move to a bottom bar and the gear opens a full Settings page. On an iPhone, Share → Add to Home Screen installs it as an app.
Playback: camera → Playback: ±10 s, previous/next event, 1–8× speed, a 15 min to 24 h timeline, and Clip → Download MP4 (up to 30 minutes). Every event anywhere opens the recording from 5 seconds before.
Handle alerts
Alerts wait until someone acknowledges them, and can go to phones.
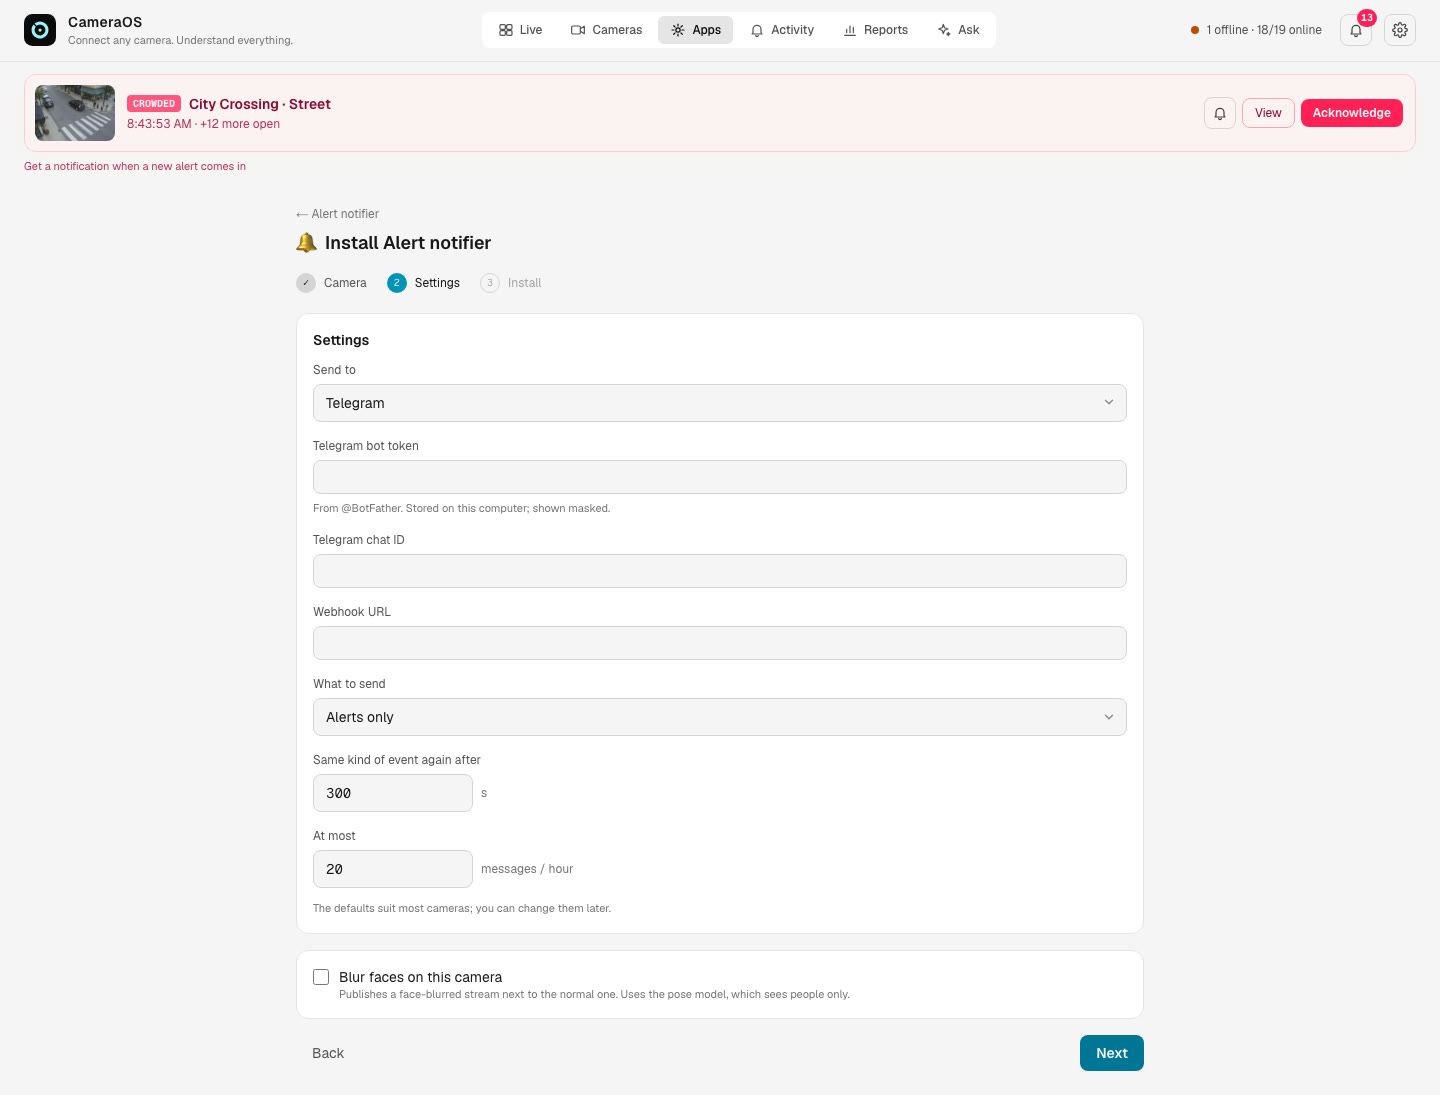
Each app decides what's an alert: a fall, an intrusion, a denied plate, a stopped line. An alert shows on every page as a banner with a sound and, if allowed, a browser notification (Get a notification when a new alert comes in).
- Press Acknowledge on the banner, or open Activity → Needs attention.
- Group by Time or By camera; Acknowledge all per camera. Repeats are grouped (“×151 since …”).
- The response time is recorded; Activity shows the average, and Reports the typical response.
Open alerts stay until acknowledged; acknowledged ones show for 24 hours. Mute the sound per browser: gear menu → Alert sound.
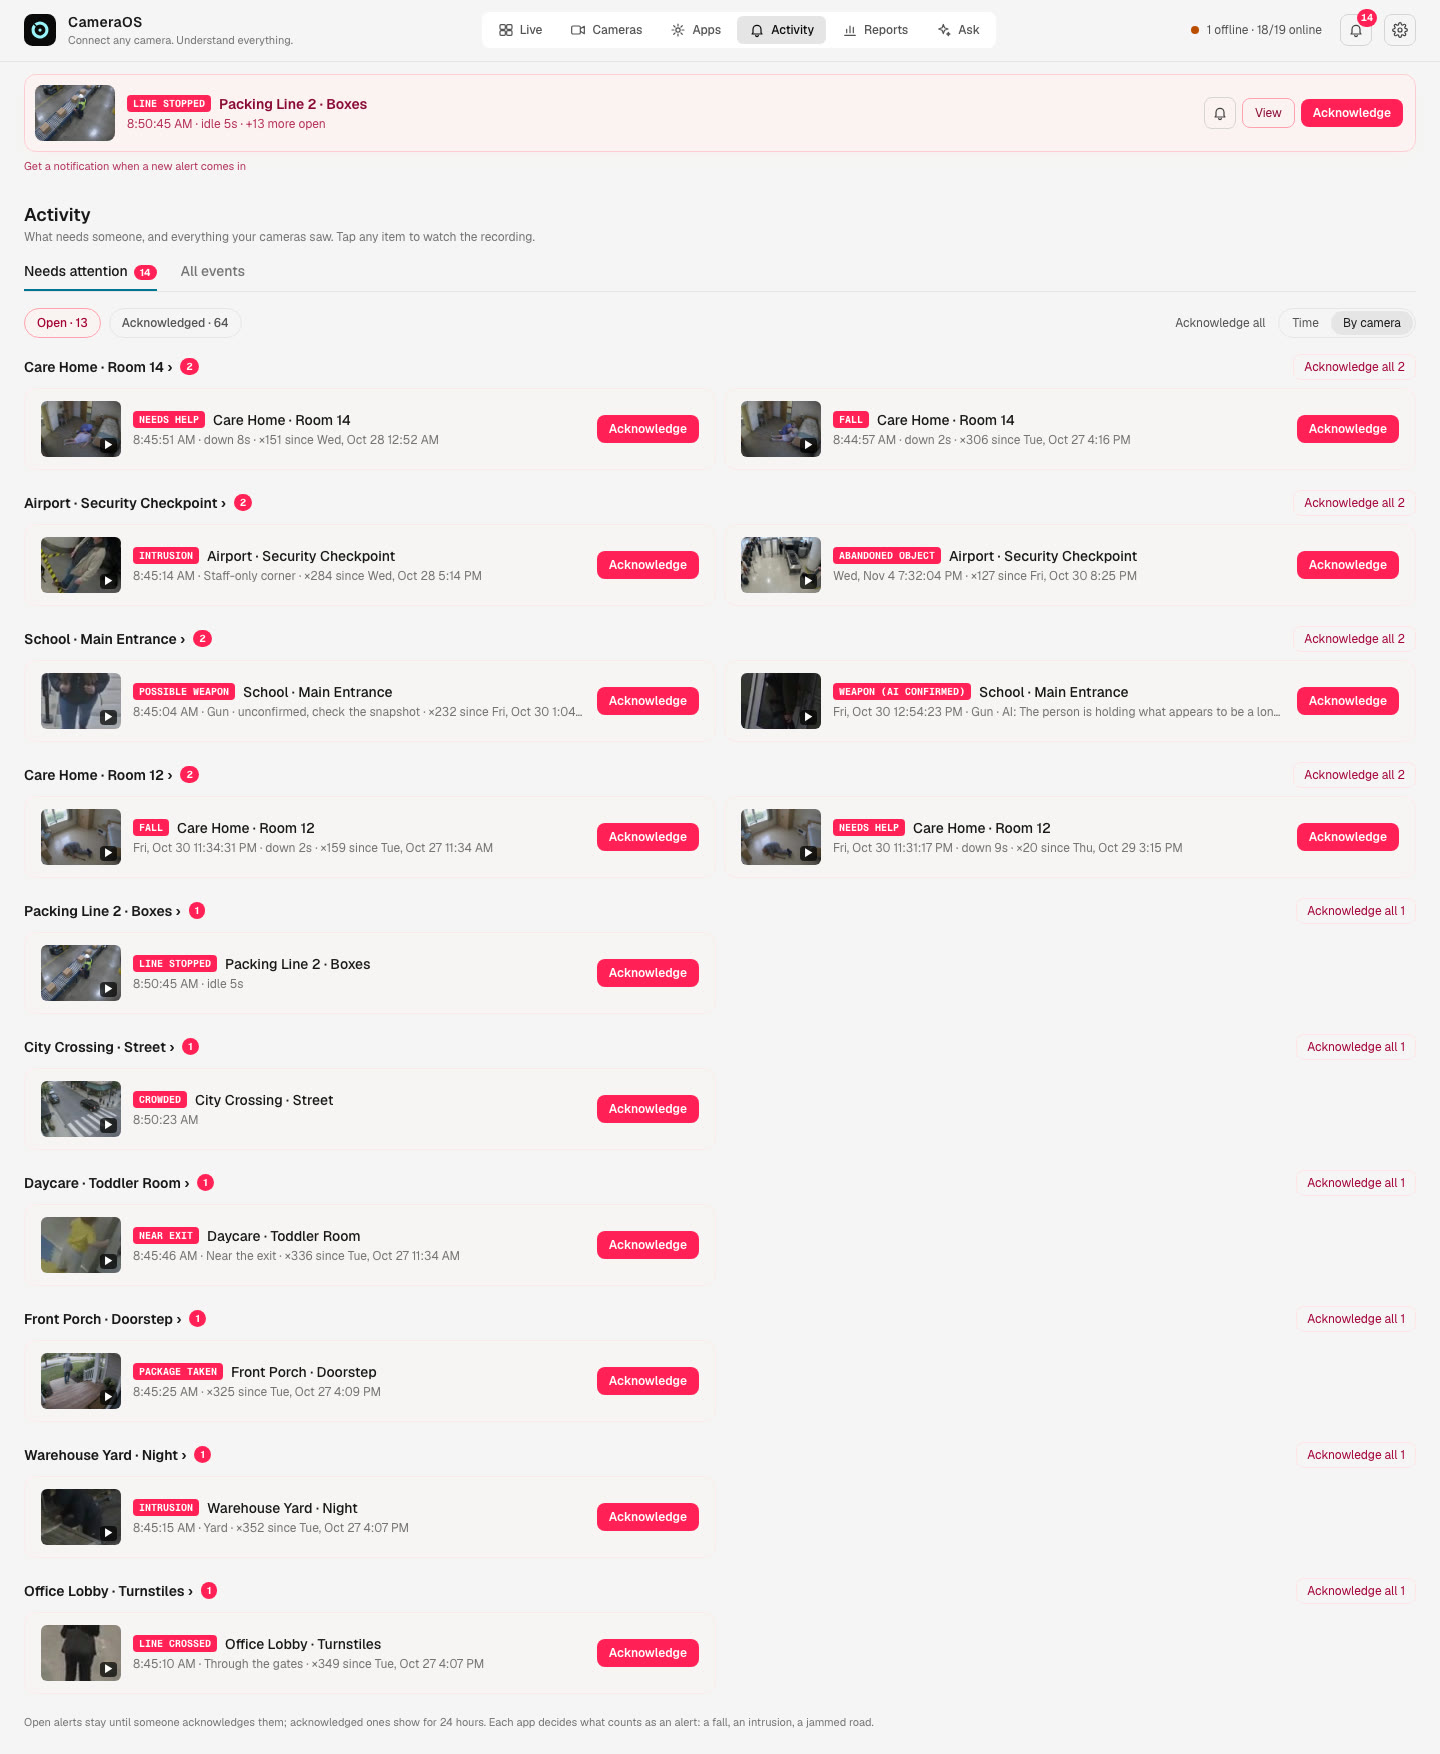
Send alerts to phones: the Alert notifier app
- Install Alert notifier on each camera whose alerts should go out.
- Send to: Telegram (a Telegram bot token from @BotFather and a Telegram chat ID) or Webhook (JSON POST) (a Webhook URL).
- Choose Alerts only or Alerts and other app events, how soon the same kind may repeat (300 s) and the most per hour (20).
- Press Send a test message: “Sent. Check your phone or endpoint.”
{
  "camera": "Care Home · Room 12", "camera_id": 16,
  "event": "fall", "label": "Person down", "alert": true,
  "ts": 1794060470.7, "details": { ... },
  "event_id": 1323380, "snapshot": "<URL of the snapshot>"
}
Telegram messages carry the snapshot with the caption “🚨 label · camera · time”. People walking in and out and line crossings are never sent.
Read the reports
What each camera measured, next to the period before, and what stands out. No AI needed.
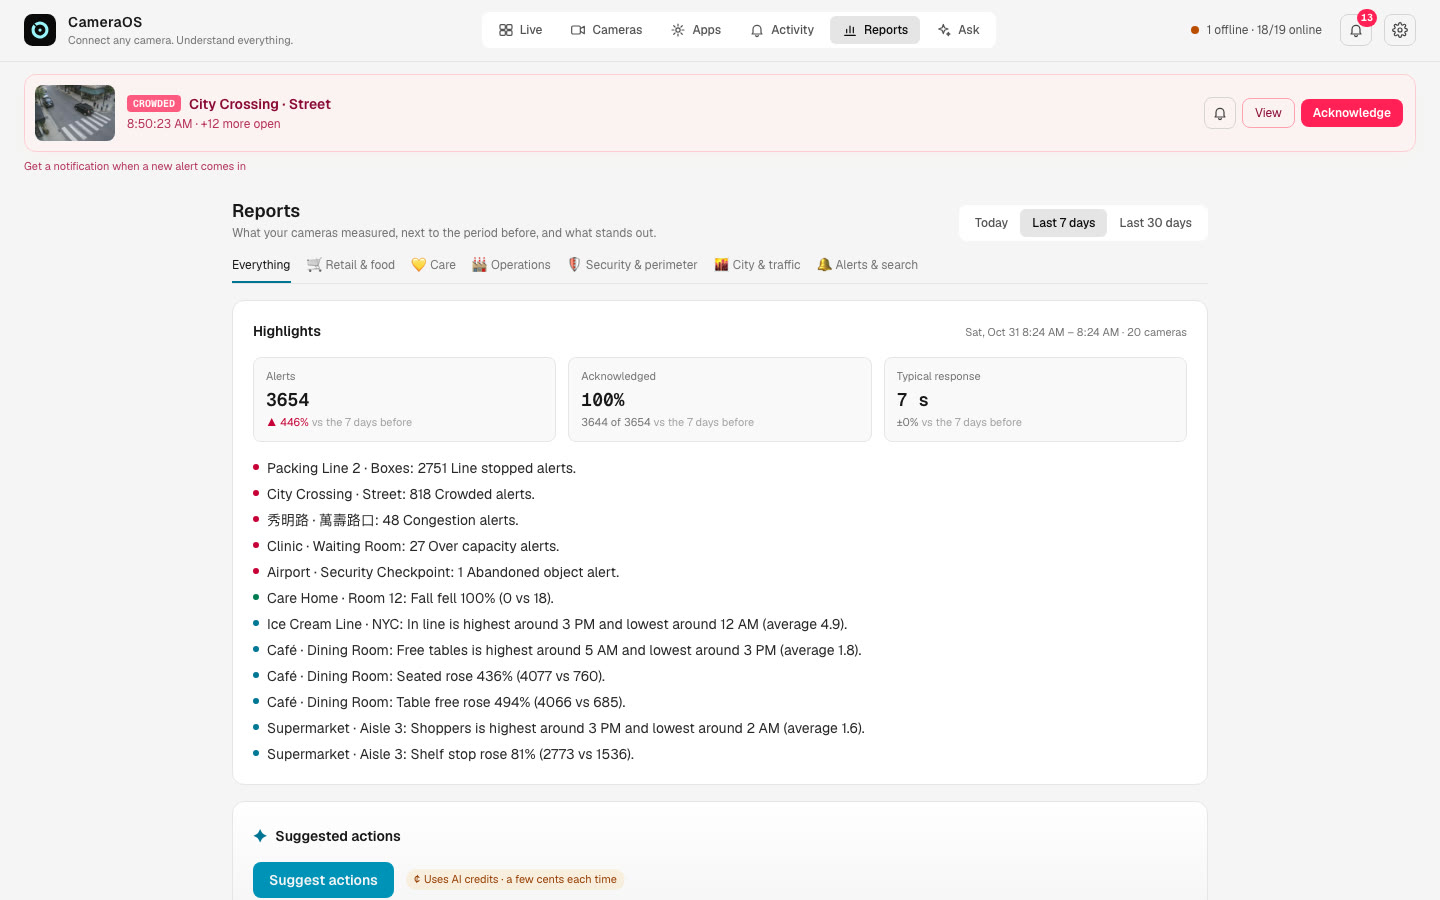
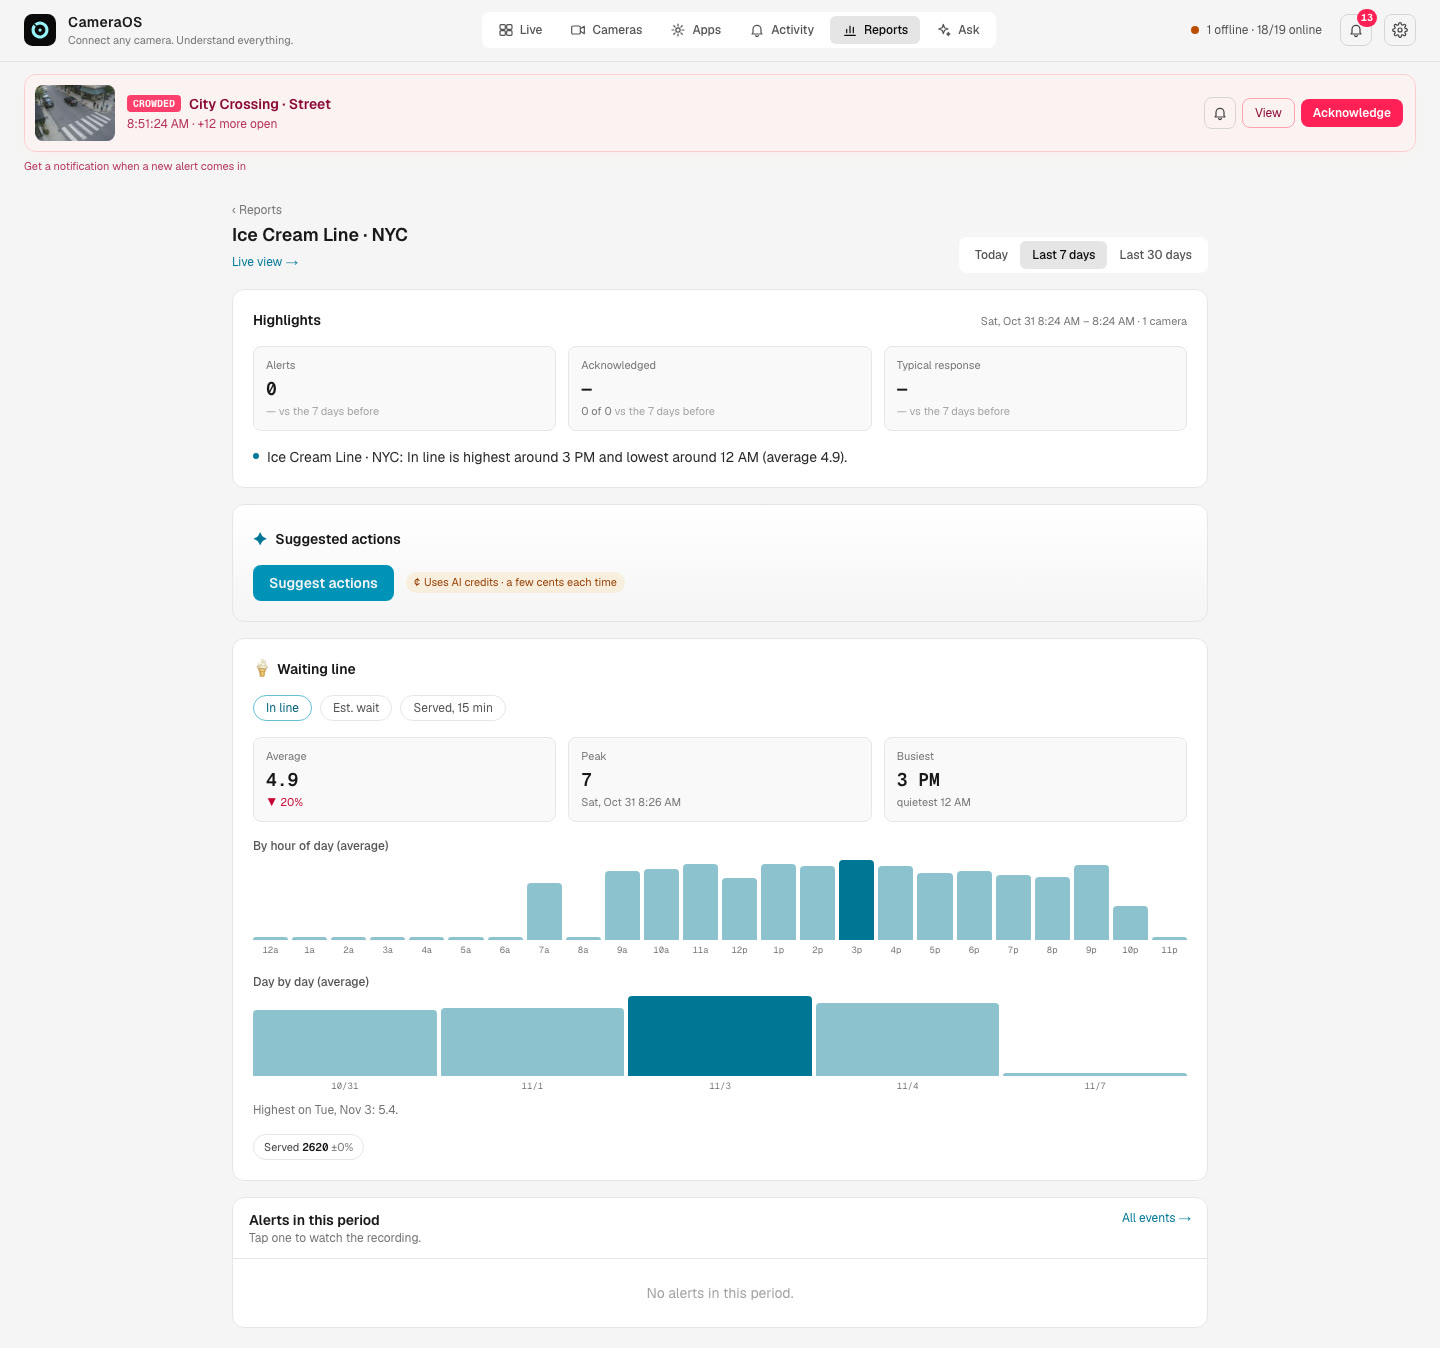
- Reports → pick Today, Last 7 days (default) or Last 30 days; each compares with the period of the same length before it. Group tabs narrow it to retail, care and so on.
- Highlights: alerts (▲▼ against before), how many were acknowledged, the typical response, and sentences written from the numbers alone: alerts that rose or fell by a quarter, each camera's busiest and quietest hour.
- Per app, per camera: each number's Average, Peak (and when), Change and Busiest hour; event counts. Green arrows are the good direction.
- Click a camera's name for its own report: a number picker, By hour of day (average), Day by day (average) and the period's alerts, each opening its clip.
Set up AI and ask questions
Choose the AI that answers, then ask about your cameras in plain English.
Choose the AI
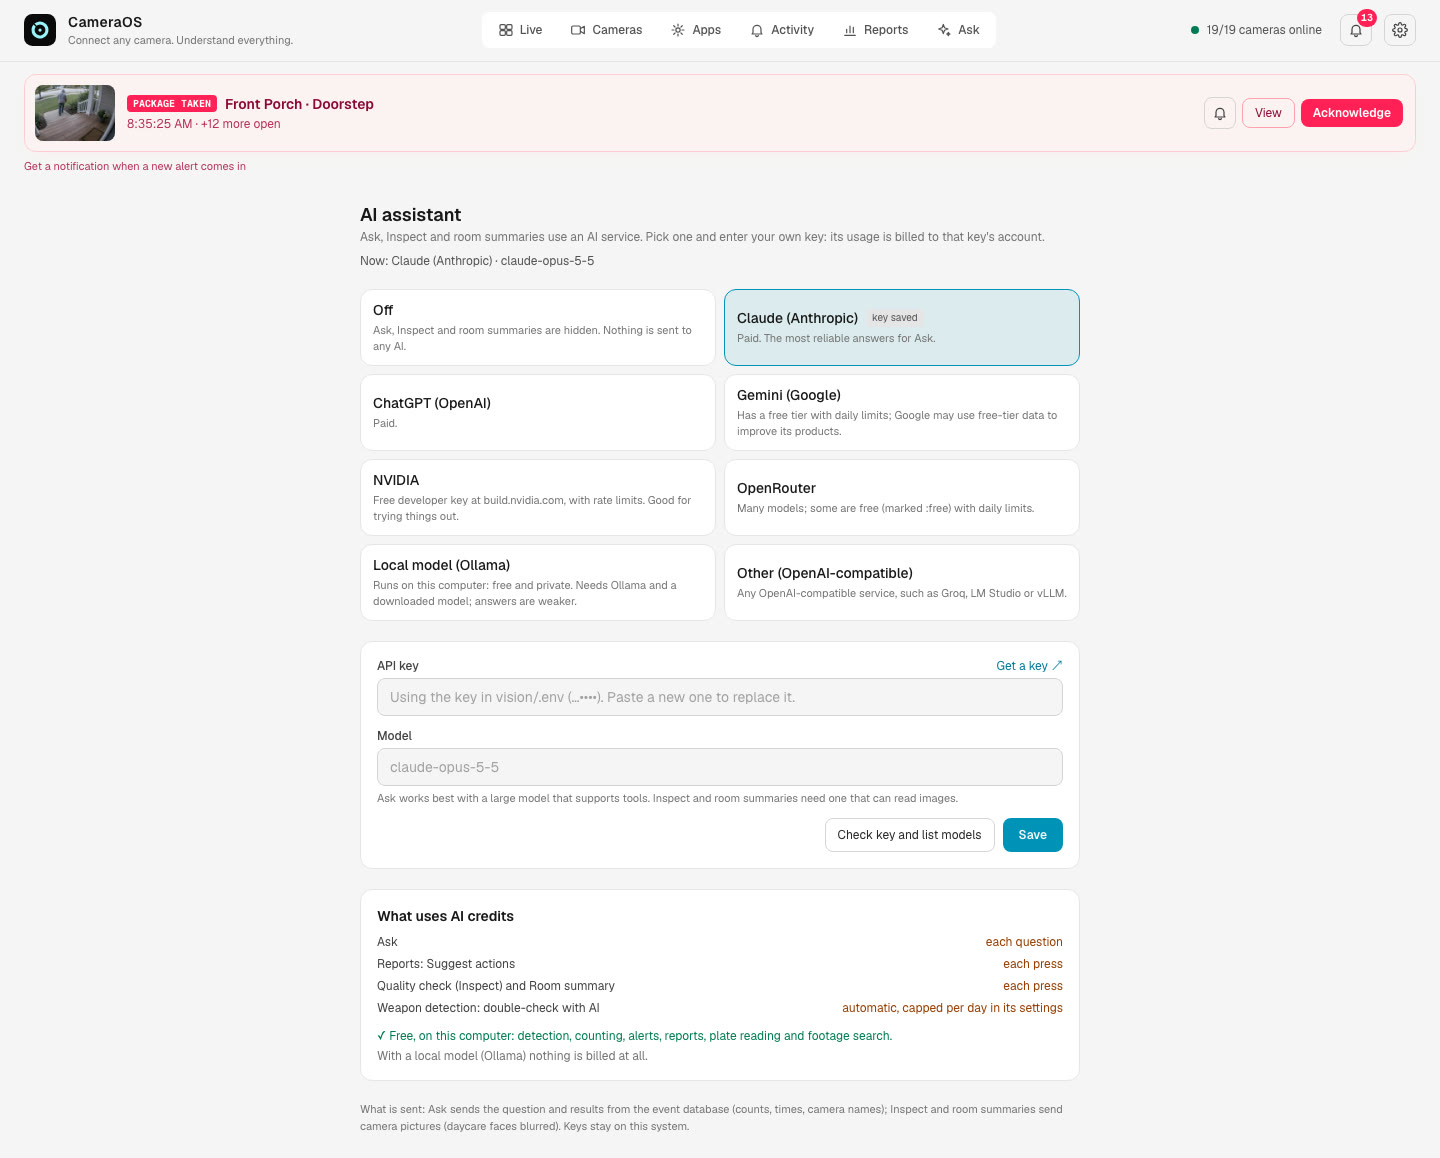
- Gear menu → AI assistant (admins).
- Pick a service, paste its API key, and press Check key and list models (spends no tokens). Pick a model and press Save.
| Choice | Notes |
|---|---|
| Claude (Anthropic) | Paid. The most reliable answers for Ask. Default model claude-opus-5-5 |
| ChatGPT (OpenAI), Gemini (Google) | Paid; Gemini has a free tier with daily limits |
| NVIDIA, OpenRouter | Free developer keys and free models with rate limits |
| Local model (Ollama) | Runs on the Mac: free and private, no key (default address http://127.0.0.1:11434/v1) |
| Other (OpenAI-compatible) | Any compatible service: an address, a key if it needs one |
| Off | Ask, Inspect and room summaries are hidden; nothing is sent to any AI |
Keys stay on the Mac (~/CameraOS/data, owner-only) and are never sent back to a browser; saved keys show only their last 4 characters.
Ask
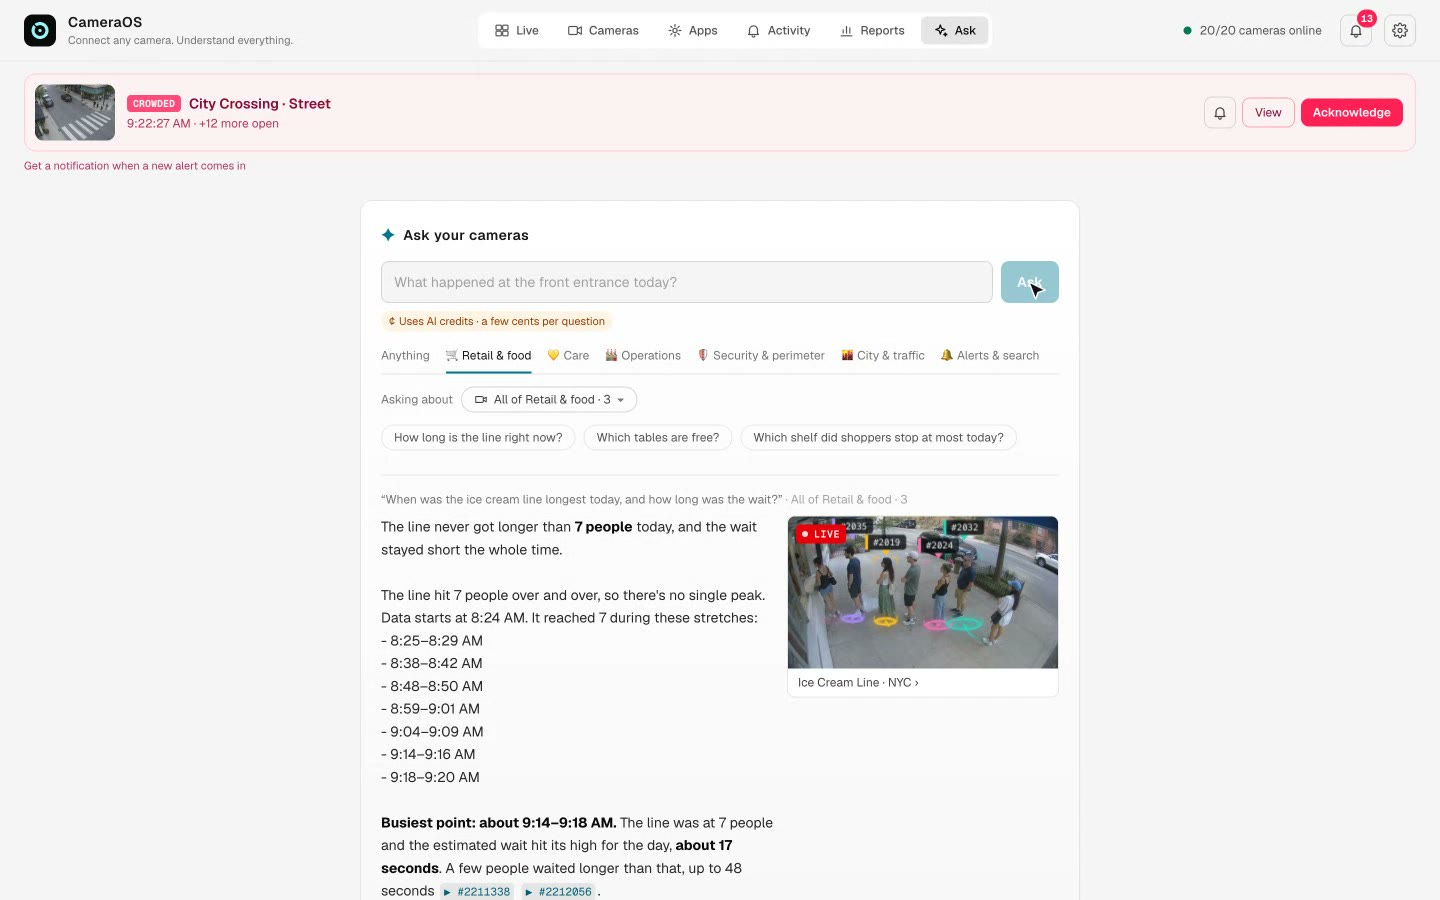
- Ask tab. Pick a group (or Anything), and under Asking about the cameras: the AI gets only their data.
- Type a question, or tap a starter question, and press Ask. Answers take from a few seconds to about a minute.
- Facts in the answer cite events: tap a citation or a snapshot to watch the clip, from 5 seconds before.
Connect your AI assistant (MCP)
Ask about your cameras in Claude, Gemini in Google Antigravity or OpenAI Codex, on the plan you already have.
CameraOS includes an MCP server, the open standard AI assistants use to connect to tools. The assistant app starts it on the CameraOS Mac and talks to it directly: nothing opens to the network, and it's read-only. Questions are answered by your own assistant, so they cost CameraOS nothing.
Write paths out in full (replace <you> with the Mac account's name; configs don't expand ~).
Claude Desktop → Settings → Developer → Edit Config. Add this to claude_desktop_config.json, save, and restart Claude:
{
  "mcpServers": {
    "cameraos": {
      "command": "/Users/<you>/CameraOS/python/venv/bin/python",
      "args": [
        "/Users/<you>/CameraOS/app/vision/cameraos/mcp_server.py"
      ]
    }
  }
}
In Terminal:
claude mcp add cameraos -- /Users/<you>/CameraOS/python/venv/bin/python /Users/<you>/CameraOS/app/vision/cameraos/mcp_server.pyAntigravity → Settings → Customizations → Installed MCP Servers → Open MCP Config. Add the same entry under mcpServers in ~/.gemini/antigravity/mcp_config.json:
{
  "mcpServers": {
    "cameraos": {
      "command": "/Users/<you>/CameraOS/python/venv/bin/python",
      "args": [
        "/Users/<you>/CameraOS/app/vision/cameraos/mcp_server.py"
      ]
    }
  }
}
Click Open MCP Config again until cameraos shows “5 tools enabled”. The agent asks before each tool call.
Add to ~/.codex/config.toml, then start a new Codex session; codex mcp list should show cameraos as enabled:
[mcp_servers.cameraos]
command = "/Users/<you>/CameraOS/python/venv/bin/python"
args = ["/Users/<you>/CameraOS/app/vision/cameraos/mcp_server.py"]
What the assistant can do
| Tool | What it gives the assistant |
|---|---|
get_live_counts | Every shared camera right now: online, what's in view, each app's live numbers |
look_at_camera | The frame the camera's AI last analysed, as a picture (faces blurred unless allowed) |
recent_events | What just happened, newest first, by camera and type |
query_database | One read-only SQL query over the shared cameras' history (up to 200 rows); no stream logins, share tokens or app secrets |
search_footage | People and vehicles by description, on cameras running Footage search |
Choose what each camera shares
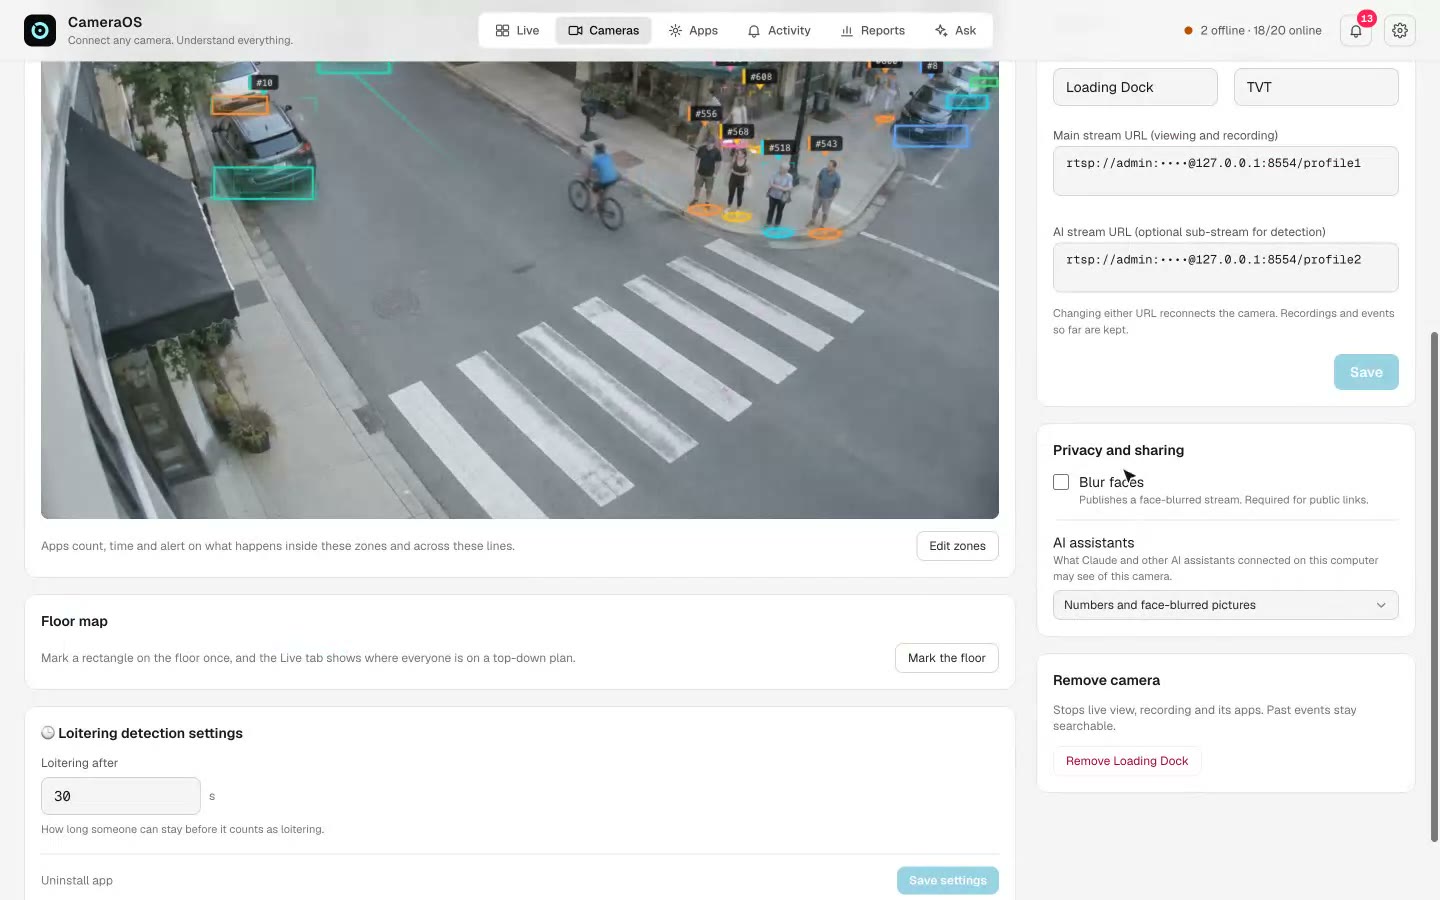
Camera → Settings → Privacy and sharing → AI assistants:
| Setting | The assistant gets |
|---|---|
| Numbers and face-blurred pictures (default) | Counts, events and history; pictures with every face blurred. If faces can't be blurred, the picture is refused, not sent. |
| Numbers and full pictures | The same, with unblurred pictures |
| Nothing | The camera is hidden from every tool |
Try it
A real conversation: Claude using CameraOS's tools on our demo cameras, Nov 4 2026.
Reference and troubleshooting
Where things live, and what to check when something's off.
Where things live (installed copy)
| Folder | What's in it |
|---|---|
~/CameraOS/app | The program (replaced on every update) |
~/CameraOS/data | Accounts, cameras, events, settings, AI keys, license, checkups (kept on updates) |
~/CameraOS/recordings | Recorded video, 10-minute segments per camera (kept on updates) |
~/CameraOS/logs | gateway.log, vision.log, web.log: send these to CameraOS if something goes wrong |
Update: run Install CameraOS.command from the new version; cameras, accounts, recordings and the license stay. Remove: Uninstall CameraOS.command asks before deleting recordings and settings.
If something's off
| You see | Check |
|---|---|
| A camera is Offline | The error on its row. Open Settings → Camera and fix the URL or password; try the URL in VLC from the Mac. Check the camera's RTSP is on and the port (554) is reachable. |
| Live video is black but the camera is Live | H.265 main stream in a browser without HEVC WebRTC (some Androids, older browsers): use Chrome or Safari on a Mac, or set the camera's main stream to H.264. |
| The AI misses people | Run the Camera checkup. Small people (under 40 px) → mount closer or higher, or apply the suggested picture size. Low sub-stream → raise it to 640×480 or 720p. |
| AI frames a second below what's set | The Mac is busy: gear → Performance. Use sub-streams, lower the rate on quiet cameras, or split cameras over two Macs. |
| A click inside a zone doesn't add a corner | You started on an existing zone: start new shapes on empty video. |
| Recording paused | The disk is almost full: gear → Storage and cleanup; lower retention or add disk. |
| Every page shows “Activate this computer” | No license, or one for another Mac or one that ended: paste the right key; gear → License shows this computer's ID. |
| Ask is missing | No AI is set: gear → AI assistant. |
| The AI assistant says it has no license or can't reach CameraOS | CameraOS must be running and licensed on the same Mac; restart the assistant after CameraOS is up. |
How far to trust each number
- Wait time is an estimate from people seen walking out of the line.
- Plates need the plate at least ~60 px wide (100 px to be reliable); a plate shows once two reads agree.
- Falls can false-alarm on someone lying down on purpose; that's why there's escalation and Acknowledge.
- Face blur can miss faces turned away, tiny or hidden: a deterrent, not anonymisation.
- Traffic counts undercount fast free-flowing traffic; treat flow as a trend. Congestion is reliable.
- Track counts overstate unique people: one person on two cameras, or briefly lost, is two tracks.
Need a hand?
Send us the computer's ID for a license, or the logs from ~/CameraOS/logs if something's wrong. We'll walk the first install with you.